WATCH IT for Jira Cloud
Watch It is a powerful add-on that allows you to take charge of watching issues in Jira. Feature areas are:
-
Create issue watcher field: Allows you to add watching by specifying them in the issue create screen.
-
Watch at the project level: Specify the types of events you are interested in and the conditions that need to be met (i.e. only highest priority issues, bugs, particular components, for a particular user ...). Notifications are sent when all of these match.
-
Automatically add a user as a watcher: If an issue is created/modified and your conditions are met then the specified users will automatically be added as watchers
-
Be notified of issues of interest at particular times: Set a timer so that users can be notified when the specified JQL query identifies issues of interest
Notifications for the first three features are by Email or within Jira and for the last feature, it is Email only.
Examples of some of what you can watch are:
-
Watch all Issues that are bugs and on Issues with the Highest priority.
-
Be automatically added as a watcher to all bugs with the highest priority.
-
Monitor changes made by a particular user (i.e. a trainee)
-
Be notified whenever work starts to be logged on an issue.
-
Get an email whenever an Issue gets a status of "Ready to Test"
-
Have everyone in a user group get an email whenever an issue is closed.
-
Receive an email whenever an issue is deleted or moved to another Project
-
Monitor each time the status of an issue changes
-
Be notified every hour when issues are marked as fixed
-
Notify the assignee when a "Highest" priority bug has been open for over a week
-
A daily reminder to an assignee when bugs have a status of started but no hours have been logged
-
Notify assignee that the issues due date are 5 days away
Sections
Configuring Watch It and add Watchers when creating an Issue
The configuration screen (Add-ons tab and Watch It section) for Watch It allows you to set up the creation of watchers when creating Issues and specify who has access to the Add Watcher Rules and Watchers tabs on each Project
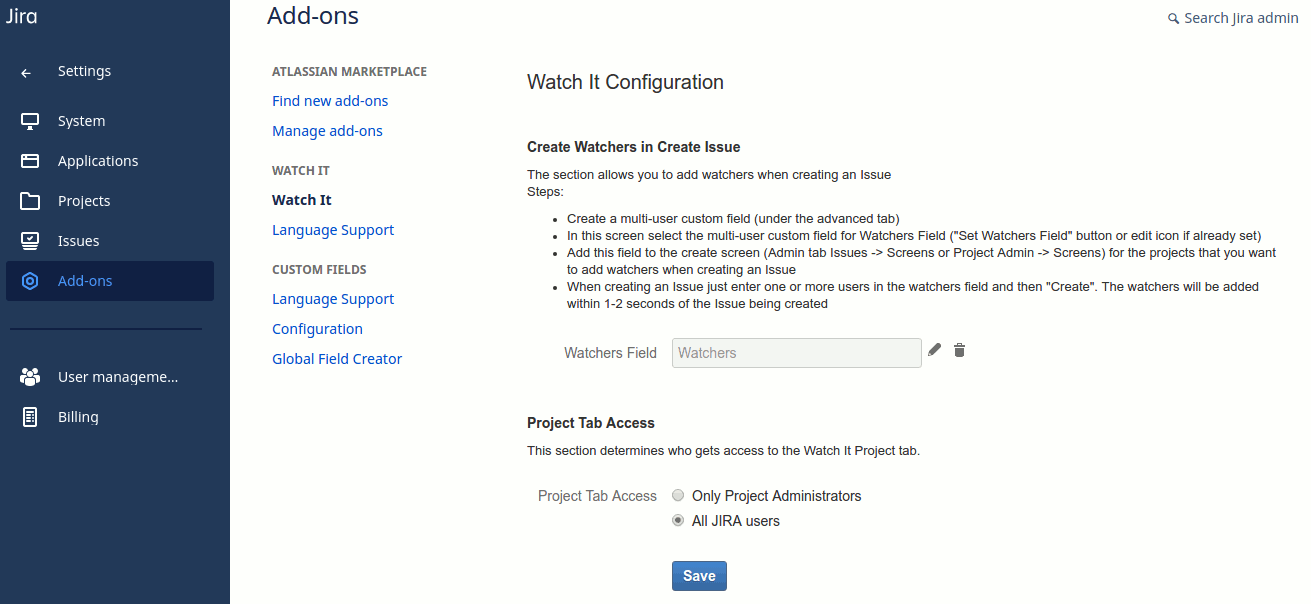
Create Watchers In Issue
This section allows you to specify a Jira Custom Field that will be used to add watchers when an Issue is created.
To do this you will need to:
-
Create a Jira Custom Field of type "User Picker(multiple users)" (from the advanced tab).
-
In the "Watch It" configuration screen (Add-ons -> Watch It) click on either the "Set Watcher Field" button (if you haven't already specified a watcher field) or the pencil icon. When the dialog opens, select the Custom Field (from step 1) to use for the watchers (NOTE: If you create the Custom Field with this screen already open then you will need to reload it to refresh the list of Custom Fields).
-
Add the Custom Field to the create screens for whichever Projects require it (Admin Tab -> Screens or Project Admin -> Screens).
-
When you now create an Issue for that Project the Watchers Custom Field (that you added) will be present. Any users entered in here will be added as watchers when the Issue is created. This sometimes may take a few seconds (i.e. you may need to refresh the page to see it).
Project Tab Access
Access to the Add Watcher Rules and Watchers Project tabs can be limited to Project Administrators only or to all users.
Project Tab - Watchers
This tab allows you to define watchers for issues within a project without having to have the user(s) added as a watcher for every issue. This allows you to change the criteria, add new watchers or remove old watchers without having to physically change the watchers for every issue.
Initially, there is just an Add button for adding your first watcher. The screenshot below shows the screen with multiple watchers already added.
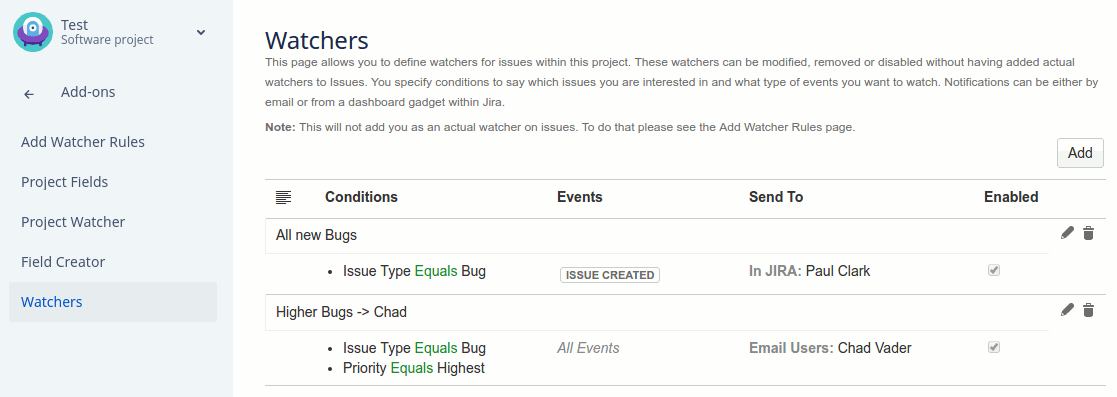
The first of the watchers above will produce an In Jira notification (displayed in the Watch It dashboard gadget) whenever an Issue with the issue type of Bug is created in the Test project. The notification will only be visible to Paul Clark.
The second watcher shown will cause an email to be sent to Chad Vader any time a change (including creation or deletion of issues) is made to an Issue in the Test project where the issue type is bug and the priority is highest.
On the right hand side of each watcher are two buttons, the pencil for editing and the trash can for deleting the watcher. Above these is the Add button for creating new Watchers. Below is the screen for adding new watchers.
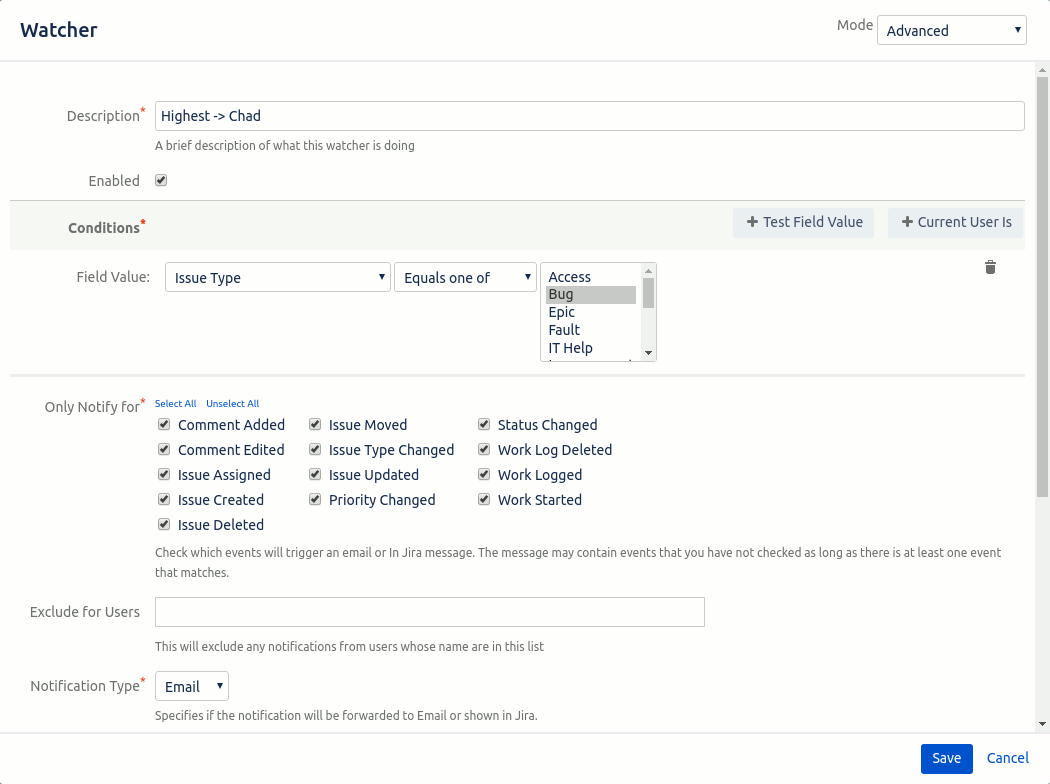
At the top of the dialog is a mode selector. This gives you two options: basic and advanced. Basic mode hides some of the fields (Exclude for Users in the screenshot above) shown in advanced mode. For simple setups basic mode is fine but if you want to add more fine tuning then simply change to advanced mode.
At the top of the screen is the Description field. This is a description of what the watcher does. This helps identify what the watcher does in the Watchers screen. The Enabled field specifies if the watcher will be processed or not. If enabled is not checked then no messages are sent.
Next, are the conditions used to determine which issues are being watched. There are two types of conditions: Test Field Value and Current User Is. Test Field Value allows you to specify fields (including some custom fields) and the values they are allowed to contain. The example above shows that this watcher is just for the issue types of Bug. Current User Is allows you to watch issues being changed by particular users. A combination of multiple conditions can be specified but all conditions must be true before a notification is sent.
Next is a list of events that are related to this watcher. At least one event in the "Only Notify for" must be selected. The events description should be enough to understand what is happening. One exception to this is the Issue Update event. This covers any updates to fields in an issue, this includes the events Issue Type Changed, Priority Changed and Status Changed, but not comment added or comment edited.
The next field is the Notification Type. This can be either Email or In Jira.
Email Notifications
If the Notification Type is email then the following options are available.
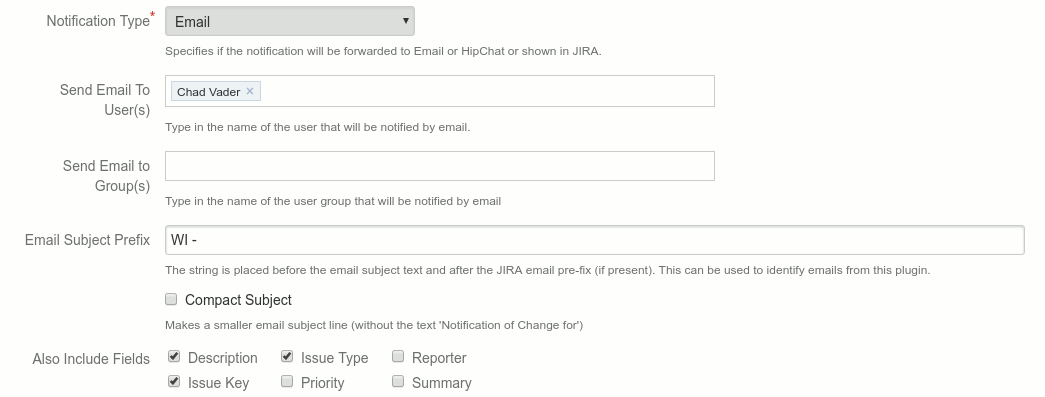
The fields "Send Email to User(s)" and "Send Email to Group(s)" determine who will get the email. You must have at least one of these fields. The first is individual Jira users that will receive the email. The second is a Jira user groups and all users in this group(s) will receive the email.
Next is the email prefix. This is an optional field and any text will be placed before the subject line in the email. If an email prefix is also defined in Jira (for the outbound email handler) then the Jira prefix will appear first, then the Watch It prefix and then the subject. After this is the Compact Subject checkbox. This allows you to have a smaller version of the email subject with just the bare minimum details.
At the end is a list of "Also Include Fields" (only available in advanced mode) which will include those field values on the email message. These are optional.
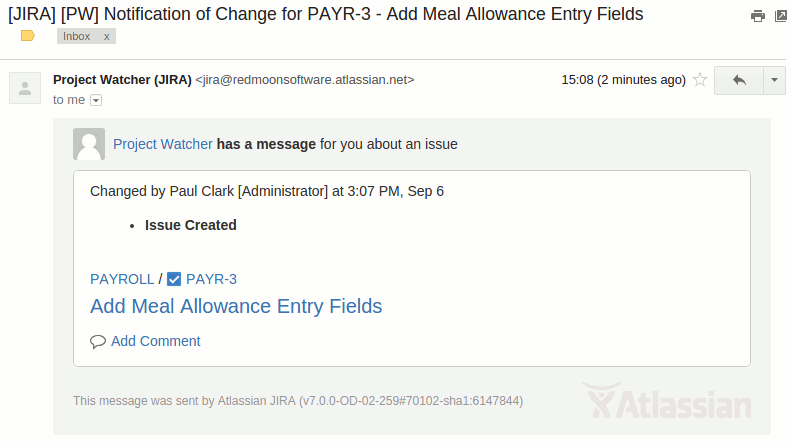
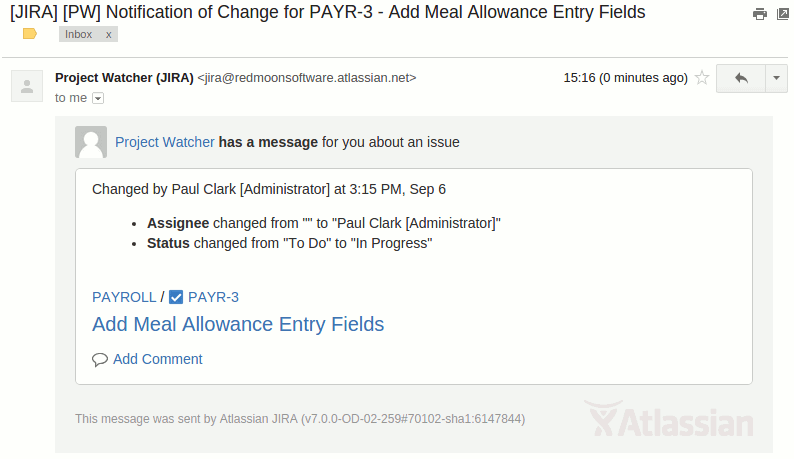
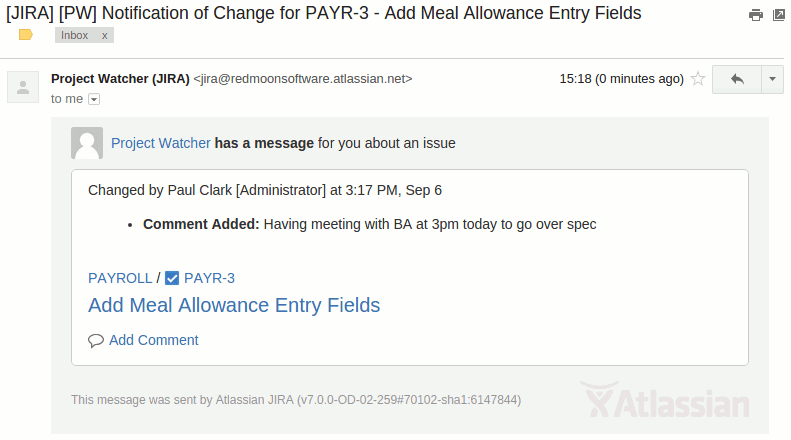
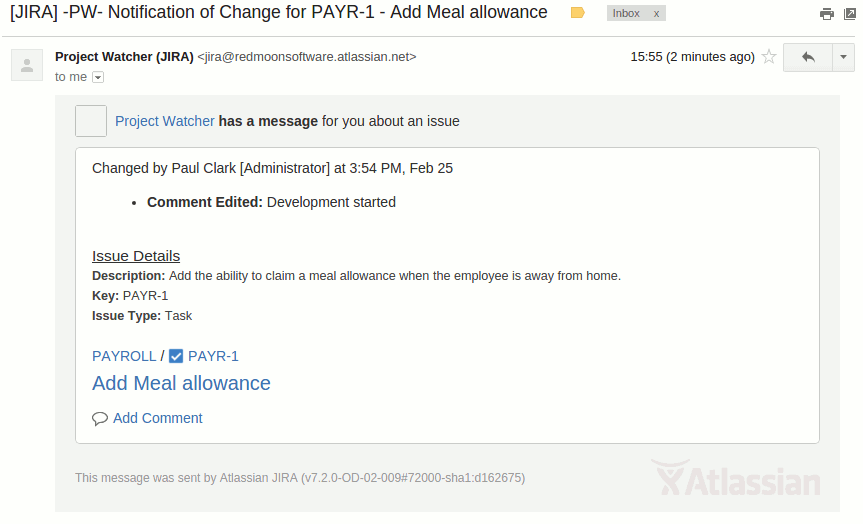
Below are some example emails. The screenshots show it is from Project Watcher because the user was created before the name of the plugin was changed to Watch It.
In Jira Notifications
If the Notification Type is In JIRA then the following options are available.

Show for Users is a list of users that will receive the In Jira notification. After this is a list of additional fields (only available in advanced mode) to include in the notification. It does not contain Issue Key or Summary as these will always be displayed in the In Jira notification.
My Notifications
To view In Jira notifications you need to add a new gadget to the dashboard.
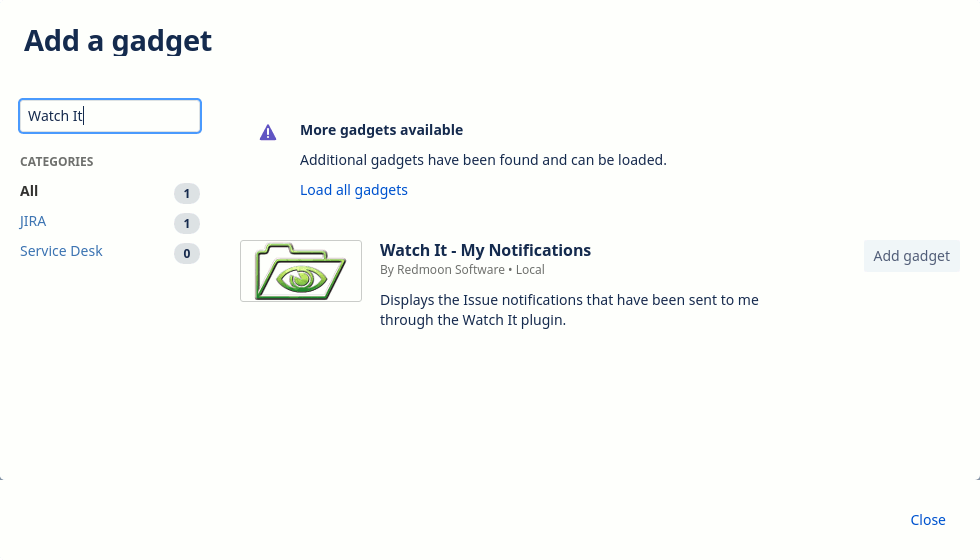
Once the gadget has been installed the In Jira notifications will be showning within the dashboard.
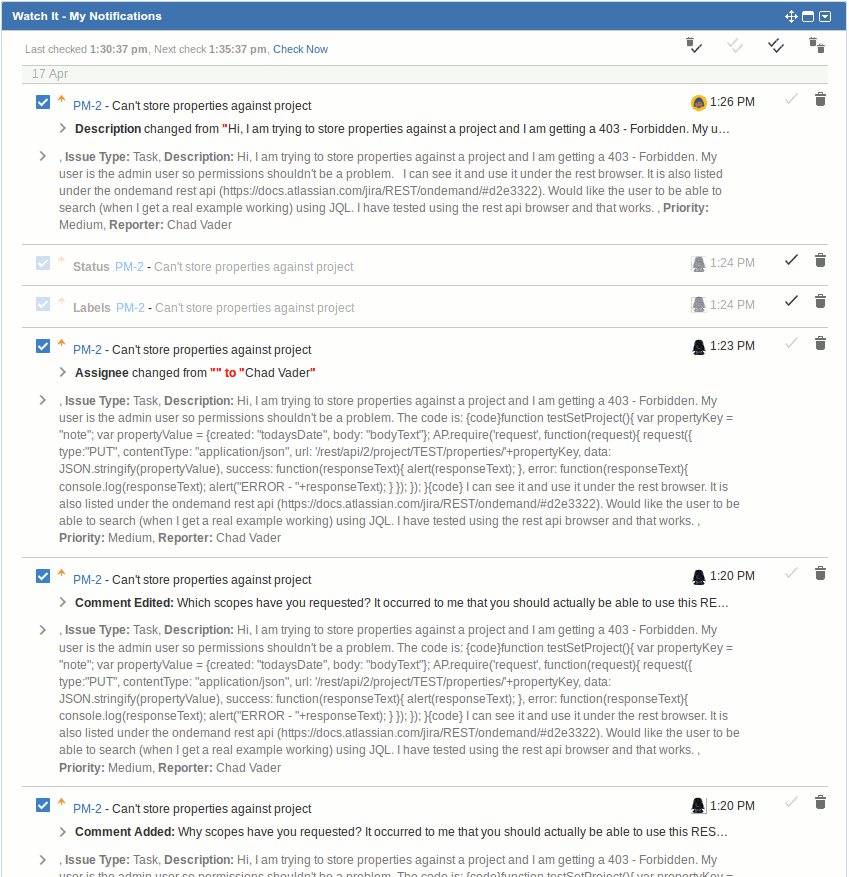
At the top right are four buttons that (left to right)
-
Delete all visible read notifications
-
Mark all visible notifications as NOT read
-
Mark all visible notifications as read
-
Delete all visible notifications
-
The buttons for deletions and marking notifications read only apply to notifications visible on the screen. By default, only the last twenty notifications are initially displayed. To see more there is a Show More link at the bottom of the list (only displayed if there are more), which will show another twenty.
At the top-left are details of when the last time new notifications were checked for when the next time new notifications were checked for and a link to force the checking for new notifications. The time between automated checks varies depending on the time of the day. Between 8 am and 6 pm checks are done every 5 minutes, between 6 pm and 9 pm checks are done every fifteen minutes and the rest of the time they are done every hour.
Notifications are group under the date they occurred. The notifications shown are initially in a minimal format. Hovering over text will show the full text and clicking on the ">" characters will expand the details to allow you to read all the information easily. On the right of each notification are a read button (to mark the notification read/unread) and a delete button. The delete button will permanently delete the notification, although there is a link shown at the top of the gadget (displayed for 10 seconds) to undo a delete.
Read notifications reduced in size and dimmed out.
Purging Old Data
Because of constraints of cloud storage, old data will be deleted using the following logic:
-
Any unread notification greater than two weeks will automatically be deleted.
-
Any read notification older than one week will be deleted.
Project Tab - Add Watcher Rules
This tab allows you to define rules that automatically add watchers to issues when they are created and/or modified. A user will only be added if they are not already a watcher. It may take several seconds before the watchers are added. If you have specified to add a watcher on update and that user removes themselves as watcher then they will be added back again when the issue is changed.
Initially, there is just an Add button for adding your first rule. The screenshot below shows the screen with multiple watchers already added.

In the first example above Joe and Chad will be added as watchers when an issue is created or modified and that issue has an issue type of Bug and a priority of Highest. So if an issue is a Story with a priority of Highest and a user changes the issue type to a Bug then Joe and Chad will be added as watchers. If an issue is created with a type of Bug and priority of Highest then Joe and Chad will be added as watchers.
In the second example, Paul will be added as a watcher only when issues are created with the component Front End and the label React. So if a user creates an issue with a component of Front End and a label of React then Paul will be added as a watcher. If an issue with a component of Front End and a label of React is modified then Paul would NOT be added as a watcher.
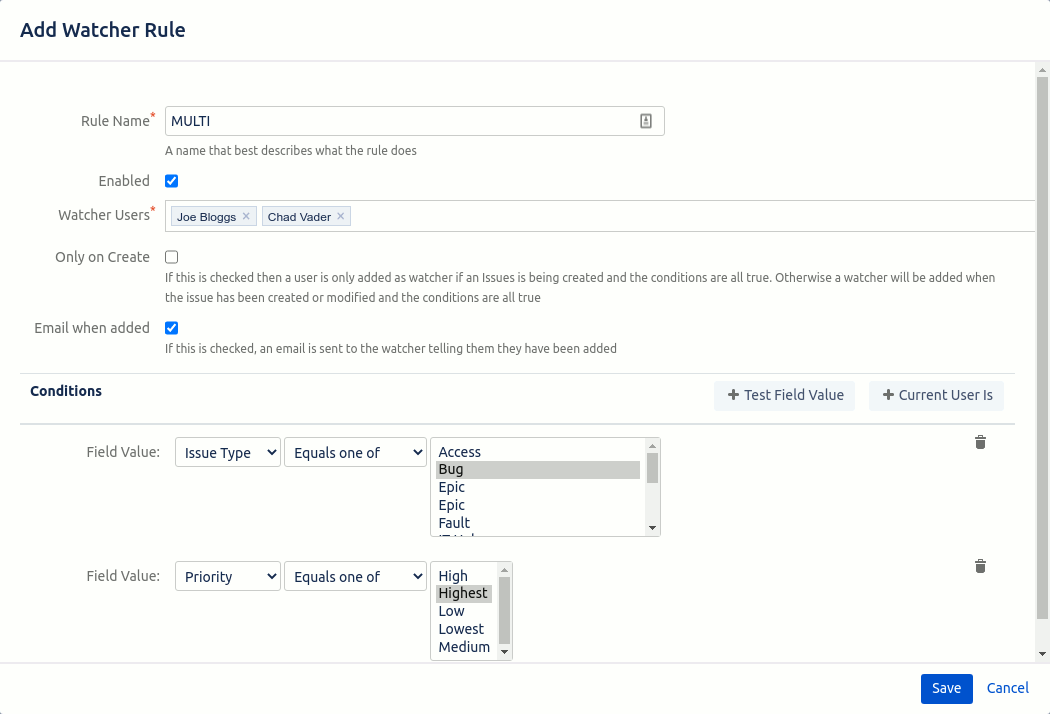
New rules can be added by clicking on the Add button, which pops up the dialog below.
At the top of the screen is the name of the rule, so the rule can be easily identified, followed by the enabled checkbox. Any rules with enabled unchecked will not be run. Next, the Watcher Users field defines which watchers to add.
The Only On Create checkbox should be checked if you only want watchers to be added when an issue is created. If this is not checked then watchers will be added whenever the issue is created or modified and the conditions are all true. Under this is the "Email when added" checkbox. If this is checked then an email notification will be sent to each new watcher after they have been added to the issue.
Next, are the conditions used to determine which issues are watchers will be added for. There are two types of conditions: Test Field Value and Current User Is. Test Field Value allows you to specify fields (including some custom fields) and the values they are allowed to contain. The example above shows that this watcher is just for the issue types of Bug. Current User Is allows you to watch issues being changed by particular users. A combination of multiple conditions can be specified but all conditions must be true before a notification is sent.
Project Tab - Timed Watcher
This tab allows you to defined timed jobs that either send an email notification or add comments for issues that are returned from the JQL query. For example each day you may wish to be notified of all highest priority bugs that created that day. At this stage, notifications are one per issue. Below is a screenshot of the Timed Watcher screen.

Each timed watcher has a description, frequency, recipients, when it will next run, when was it last run, if it is enabled and three buttons to edit the watcher, look at the last run history (see below for more details) and delete the watcher.
New Timed Watchers can be added by clicking on the add button. An example of the dialog that is opened is shown below. At the top right corner is a mode select box. This has values of Basic and Advanced. The advanced mode shows additional fields to what is shown below, which can be seen in the
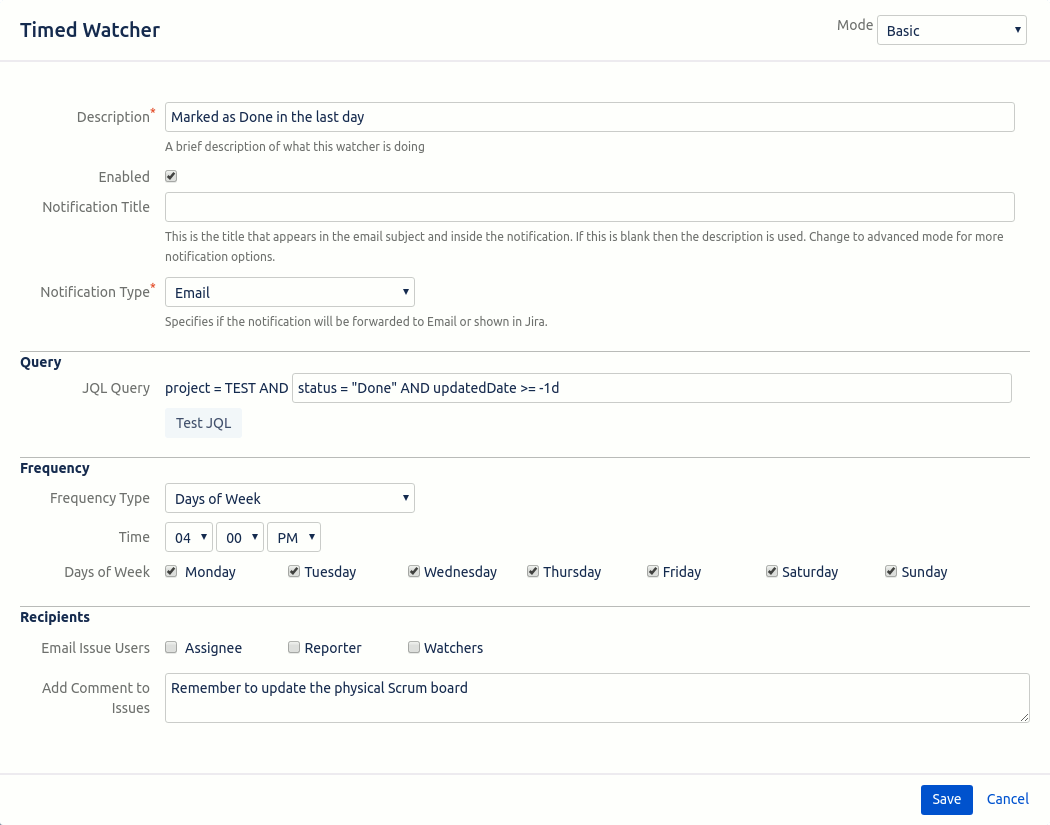
At the top of the dialog is the description is used to allow easy identification of the watcher in the timed watcher tab. Next is the enabled checkbox that allows you to stop the watcher being run when it is not required. The notification title is the heading text that displayed in the email notification (If this field is blank then the description is used instead).
The notification type allows you to receive the notification either as an email or within Jira. See the cron example below for In Jira options.
The query section is where the JQL is entered. The JQL is automatically restricted to the current project. Any additional JQL can be entered and the Test button can be used to see if the JQL is valid.
The frequency section allows you to specify how often the watcher will be run. The different frequency types are Days of Week, Days of Month and Cron Expression. The latter two will be described below. When using Days of Week you need to select the time to run at and which days of the week to run on.
In the recipients section, you can specify to send the notification as an email to the assignee, reporter and/or watchers of the issue or to add a comment to the issue. In this case, a comment will be added to the issue which will then cause a normal Jira notification to be sent to all watchers.
Next is an example of Days of Month frequency type.
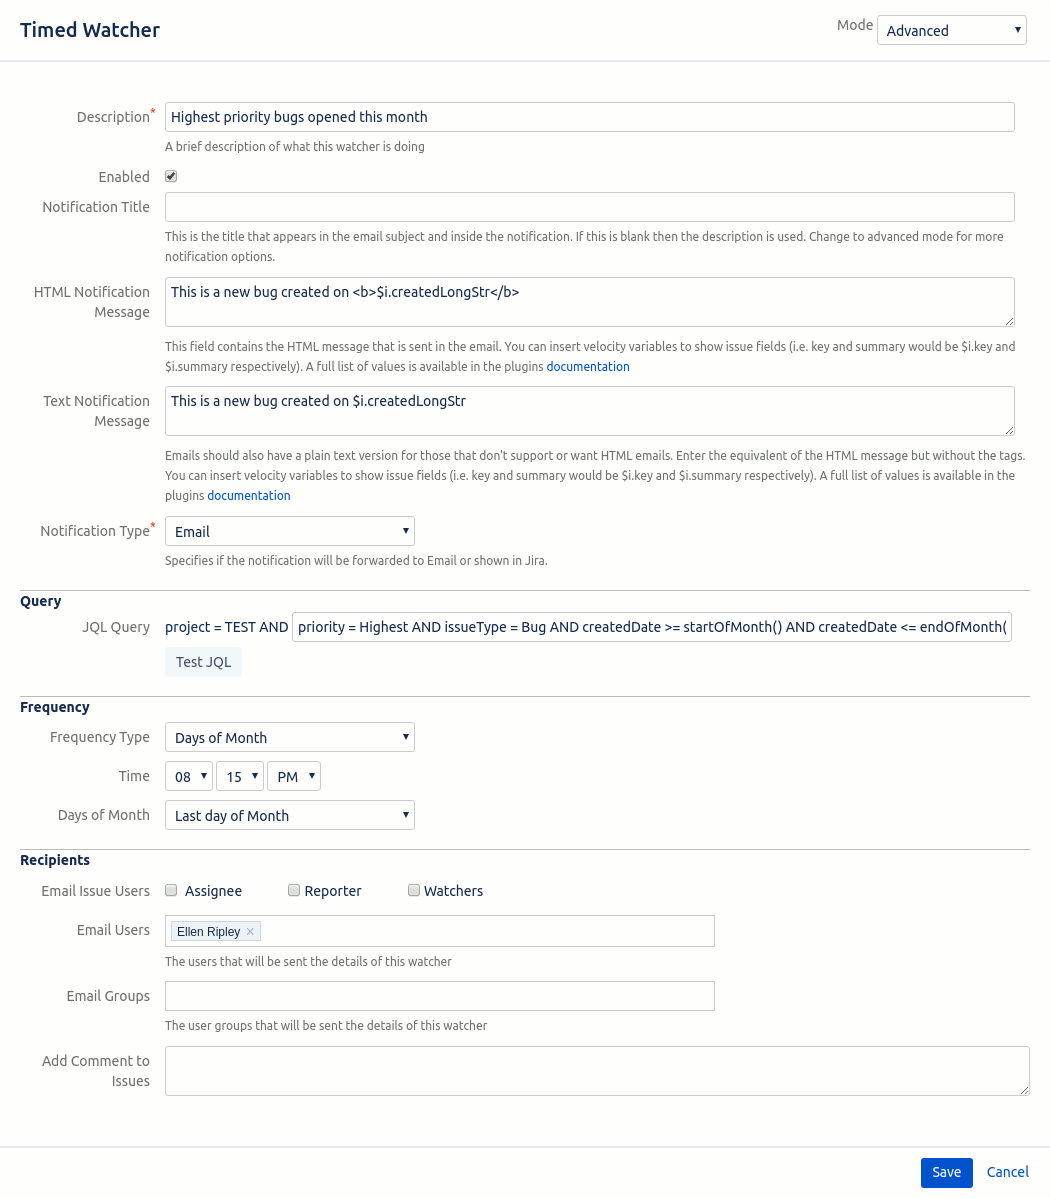
For this dialog, I will just describe what is different from the previous example. As you can see at the top right corner of the dialog this watcher is in advanced mode. The causes the HTML Notification Message, Text Notification Message, Email Users and Email Groups fields to be displayed. The Text and HTML Notification allows you to enter a message that is displayed in the notification between the Notification Title and a description of the Issue. There are both HTML and Text messages to cater to users that can only receive text emails (or choose to in Jira).
Both message are Velocity 1.7 templates so they can accept Velocity syntax including conditionals and variables to reference the issue fields. The fields that can be referenced are:
-
$baseUrl: The URL for Jira
-
$notificationTitle: The watchers notification title or description if no notification title was given
-
$helper: A helper class that allows you to check if a value is null or blank or not ($helper.isBlank($i.key), $helper.isNotBlank($i.key) )
-
$i.assigneeDisplayName: The users full name
-
$i.assigneeIcon16x16: The assignees image URL (16x16 pixels)
-
$i.assigneeIcon24x24: The assignees image URL (24x24 pixels)
-
$i.assigneeName: The assignees Jira name
-
$i.baseUrl: The URL of your Jira instance (i.e. https://redmoondev.atlassian.net)
-
$i.components: A list of components. Each item in the list has a name
-
$i.created: The date the issue was created. Also available as a string formatted in a long, medium and short version (i.e. $i.createdLongStr=9 November 2017 12:03:46 PM, $i.createdMediumStr=9/11/2017 12:03:46 PM and $i.createdShortStr=9/11/17 12:03 PM)
-
$i.creatorDisplayName: The full name of the user that created the issue
-
$i.creatorIcon16x16: The issue creators 16x16 pixel image URL
-
$i.creatorIcon24x24: The issue creators 24x24 pixel image URL
-
$i.creatorName: The creators Jira name
-
$i.description: The issues description
-
$i.dueDate: The due date of the issue. Also available as a string formatted in a long, meduim and short versions
-
$i.fixVersions: A list of fixed versions. Each item in the list has a name and description.
-
$i.id: The id number of the issue
-
$i.issueTypeDescription: The description of the issue type
-
$i.issueTypeIconUrl: The icon of the issue type
-
$i.issueTypeName: The issue type name
-
$i.issueTypeSubtask: Specifies if the issue type is a sub task or not (either true or false)
-
$i.key: The key of the issue (i.e. TTM-53)
-
$i.labels: A list of strings, one for each label
-
$i.priorityIconUrl: The icon of the priority
-
$i.priorityName: The name of the priority
-
$i.projectIcon16x16: The 16x16 pixel image URL for the project
-
$i.projectIcon24x24: The 24x24 pixel image URL for the project
-
$i.projectId: The id number of the project
-
$i.projectKey: The key of the project (i.e. TTM)
-
$i.projectName: The projects name
-
$i.reporterDisplayName: The full name of the reporter
-
$i.reporterIcon16x16: The 16x16 pixel image URL for the reporter
-
$i.reporterIcon24x24: The 24x24 pixel image URL for the reporter
-
$i.reporterName: The Jira name for the reporter
-
$i.statusDescription: The description of the status
-
$i.statusName: The name of the status
-
$i.summary: The summary if the status
-
$i.updated: When the issue was last updated. Also available as a string formatted in a long, meduim and short versions
The frequency type for this watcher is Days of Month. You need to specify a time to run and either a day of the month or the first weekday of the month, the last weekday of the month or the last day of the month.
In the Recipients section the advanced mode allows us to send emails to individual users or groups of users. These will still be individual email, one per issue returned from the JQL query.
The email notification produced from this watcher will look like:

The last Frequency type is Cron Expression.
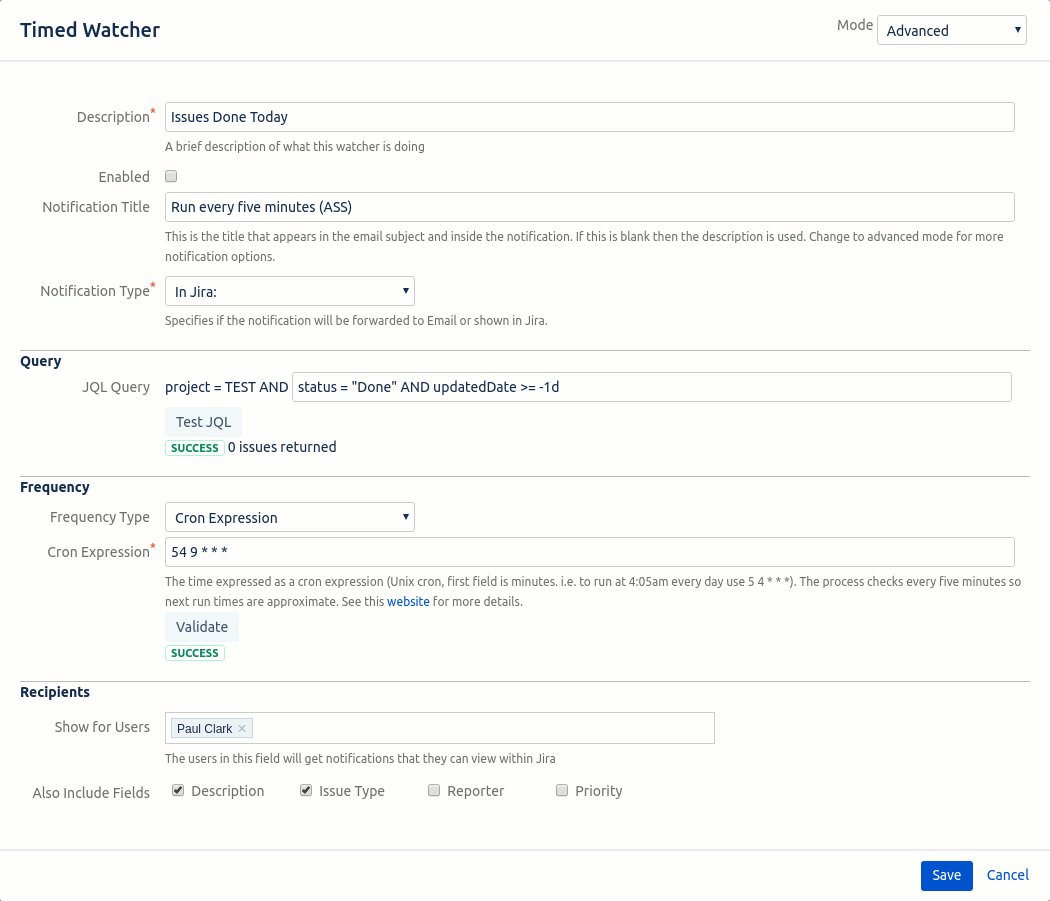
Cron watchers have a Cron Expression field. This allows you to specify the run times using a Unix style cron expression. For instance, the cron expression above says to run every day at 9:54 am.
This watcher also has a notification type of In Jira. Any notifications are added to the My Notification gadget on the dashboard for the user(s) mentioned in the Show for Users field. The notification can also optionally include the fields Description, Issue Type, Reporter and Priority (the Also Include Fields options are only available in Advanced mode).
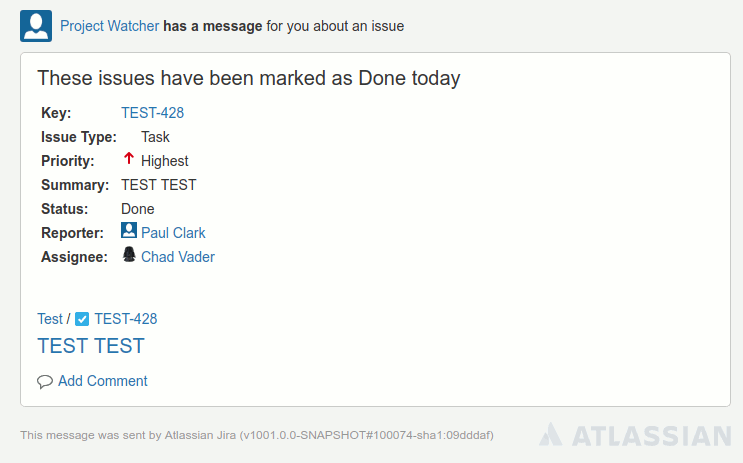
The resulting email from this notification would be:
Logs
Each time a watcher is checked a corresponding log is created. These can be examined by clicking on the clock like icon to the right of the watcher on the timed watcher screen. This will open a dialog like that shown below.
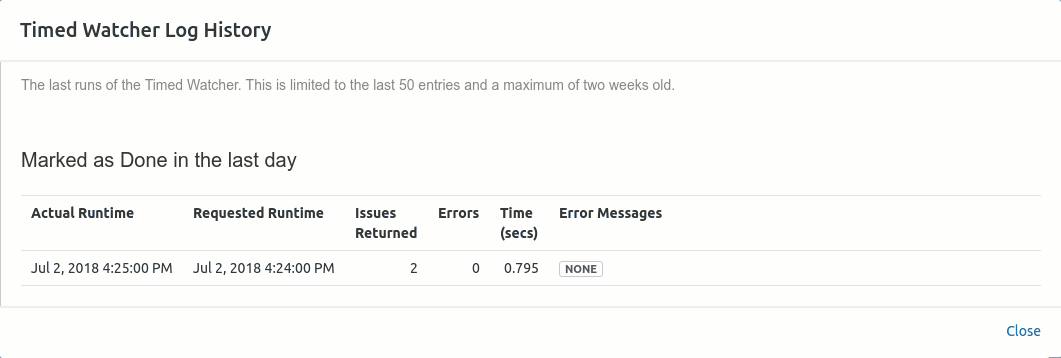
This dialog shows the log history, up to the last fifty items and records no older than two weeks. Logs older than two weeks are purged.
The logs tell you when watcher was run, when it was scheduled to run, the number of issues the JQL returned, how many errors there were, the time it took to run and any error messages produced.
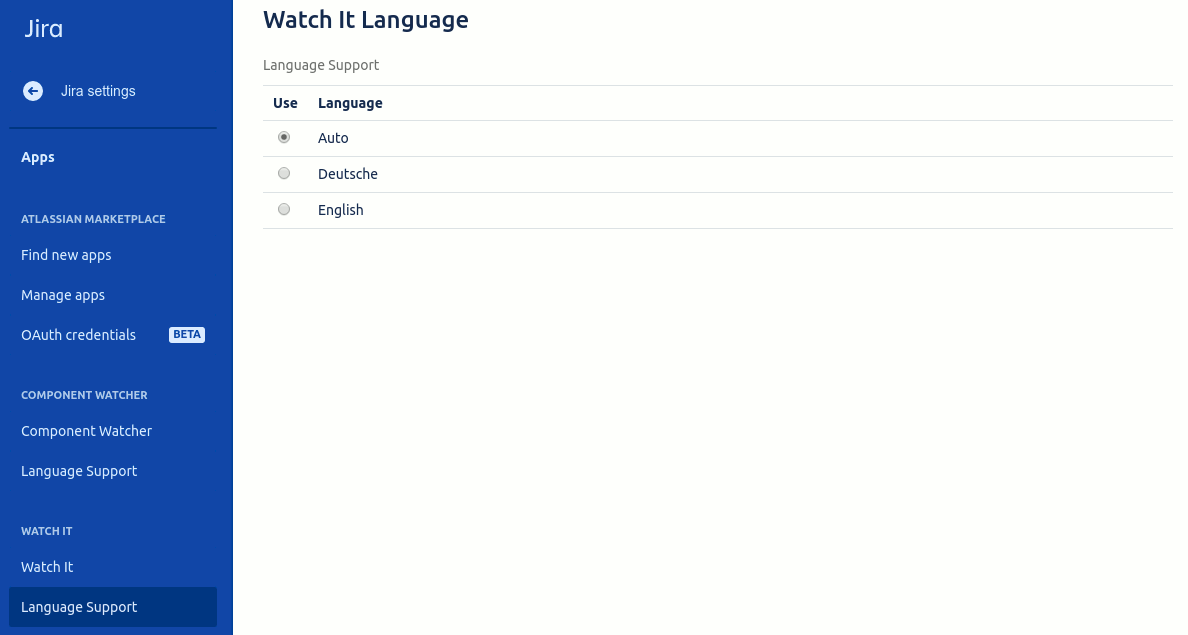
Language Support
NOTE: Translations apply to all text EXCEPT the menu text, tab text, and panel heading text.
The Langauge Support section allows you to choose a language to use or get the App to choose for you. Watch It comes with two languages pre-installed: English and German.
