** An Atlassian Gold Partner **


STM Transition Manager for Jira Cloud
STM provided a simple way of creating commonly repeated issues. This can be done manually, when an issue is transitioned to another status or when an issue is created. STM can also be used to transition child, parent or related issues when an issue is transitioned to another status.
Using subtasks, linked issues, and Epic issues is a common method for breaking up the work involved in a JIRA Issue. STM Templates can either be created for a specific project or globally (for all projects or a set of projects). These can then be used to create multiple Sub Tasks / Linked Issues / Epic Issues either manually or automatically (on Issue creation or a transition to another status)
Important: The fields that are displayed and the fields that can be copied from the parent are dependent on having been set up for the Create Issue screen in the project (Project Administration -> Screens -> Create Issue). If, for example, the due date is not in the Projects create screen then it will not appear as an entry field in the Create Issue view or as a copy from parent checkbox.
Warning: Creating issues during transitions or the creation of other Issues is a powerful feature. You need to be careful that you don't set up loops (Issue A's creation causes Issue B to be created which causes Issue C to be created...).
New Features:
-
Transition child, parent or related issues when an issue is transitioned to another status
-
Update Templates now allow you to automatically update an Issue. You create an Update Template with the fields you want and create an Executor that specifies when the update will occur.
-
You can now move Executors and Templates between Projects or globally.
-
New Wizard user interface to make creating a template simpler.
-
Cascading Templates allow you to create templates in sequence. Choose the advanced feature set and at the bottom of the template, you can select one or more templates to create after this one.
-
Global Executors to create issues automatically for one or more projects
Sections:
Global Executors - Automatic issue creation
Defining Templates for creating Issues
For this section, the details apply to creating sub-tasks, Epic Issues, linked Issues and unconnected Issues (Issues with no relationship to the parent).
Templates for creating Issues are defined either globally for an individual project.
Project Templates
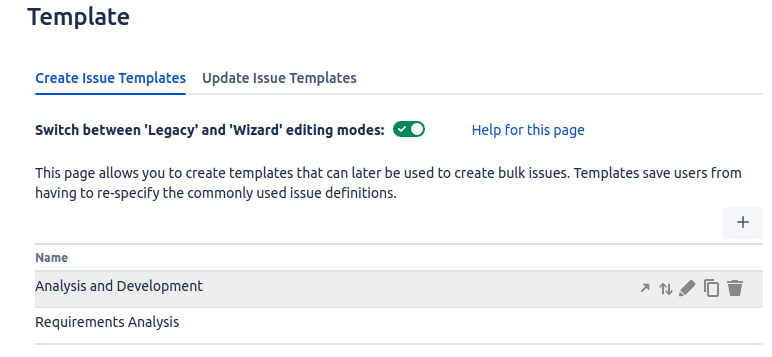
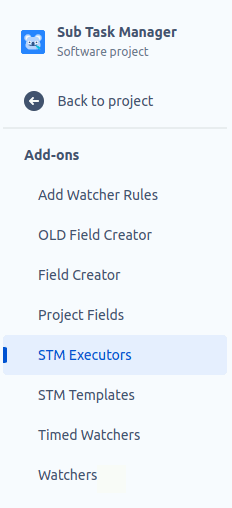
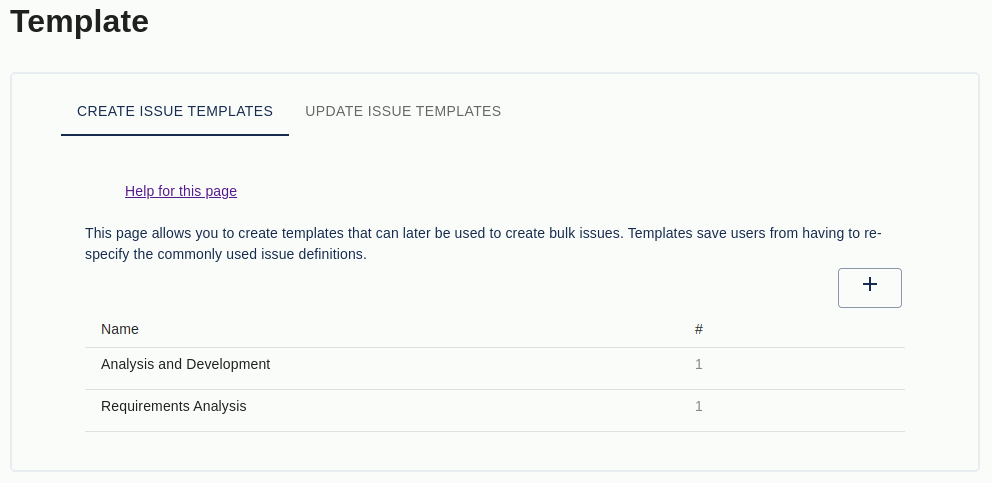
You can define Templates, for creating Issues, for each Project. The Project Templates screen is available as a Project tab and can be accessed by Project Admins only or those users defined in the Project Template Access group list in the configuration screen. You can get to the page by going to the general Project pages, Add-ons and then STM Templates
The image below shows the page where templates can be added and edited
Once a template has been defined you can hover over it to see the icons. You can sort the Issues in the template by using the up/down arrow icon, edit it using the pencil icon, duplicate it by using the copy icon or delete it using the trash can icon.
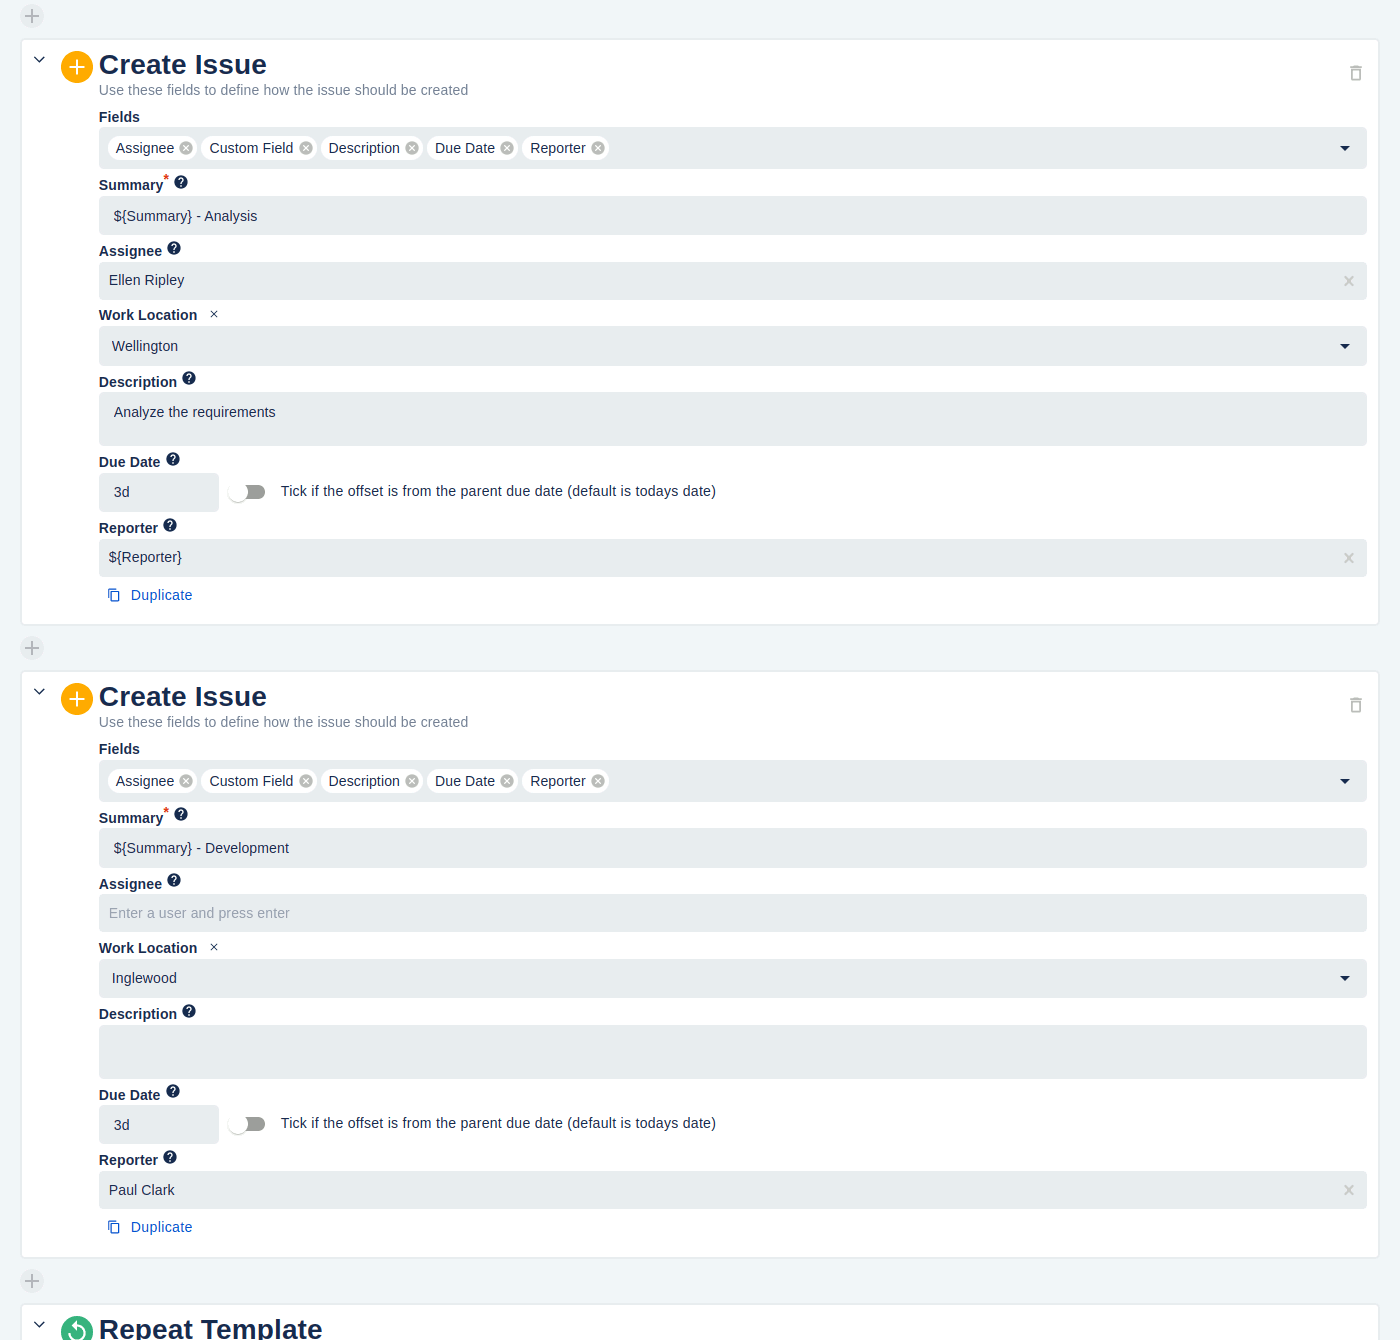
New templates can be added by clicking on the Add button (the plus icon in the top right-hand corner) and this will open the create page shown below.
Details Section
There is a Create Issue section for every issue the template needs to create. The examples above have two different issues to create but you are free to define any number you like as long as you have at least one. Occurrences of question marks in a circle are help for the field to the left of the question mark. Hovering over these will give you helpful information about the field.
The following fields are available in the Create Issue sections:
-
Summary: the summary of the Issue. You can refer to parent fields here by using one of: ${Summary}, ${Description}, ${Type}, ${Assignee}, ${Reporter}, ${Priority} or to a custom field, i.e. ${My Custom Field Name}. If no value is present then the word null show unless an ! is placed after the $ symbol (i.e. $!{Description} will show the description if it is present otherwise it will show nothing). Field references are case sensitive. If this is a Repeating Template (see below) then you can refer to the repeated field value by using ${RepeatItem}
-
Assignee: The user that the issue will be assigned to. You can also refer to the parent issues reporter or assignee by entering ${Reporter} or ${Assignee} respectively.
-
Components: The component(s) that the issue should have.
-
Description: a description of the Issue. You can also refer to the same fields as defined for the Summary (i.e. ${Reporter} etc)
-
Due Date: either the word today (for the day the Issue is created), a date (in the format YYYY-MM-DD) or the number of days, weeks and months (in this order) from the day the Issue is created (i.e. 1m 2w 3d for one month, two weeks and three days, 2d for two days ...)
-
Original Estimate: the number of minutes, hours, days and weeks (is this order i.e. 3d 4h, 1w 10m ....), a percentage of the parent's original estimate (20%) or as a multiplier of the parent estimate (*0.25)
-
Fix Versions: The fix versions for this issue.
-
Issue Type: Tthe issue type that the newly created Issue will have
-
Labels: Any labels you wish to add
-
Priority: one of the pre-defined priorities for an Issue
- Reporter: Start typing the user's name and a selection of matching names will appear. You can also refer to the parent issues reporter or assignee by entering ${Reporter} or ${Assignee} respectively.
-
Custom Fields: you can specify any custom field (up to five total) of type single-line text, multi-line text, number, and single select item, multi-item select, URL. The value for that selected field can be specified.
-
Project Key: The key of the project this issue belongs to (can't be used for subtasks).
-
Add Watcher: Adds the specified users to the as watchers of the Issue created
-
Add Comment: Adds a comment to the issue created
You can add more fields to set by selecting them from the "Fields to display" dropdown menu. You can also remove fields by clicking the X next to their name. The fields in each Create Issue section can be different for each Create Issue.
The fields that are showing don't necessarily have to have values in them. In the example above the second-row description and assignee fields are visible but empty. This allows the user, using the template to manually create bulk Issues, to easily enter those fields without having to select them.
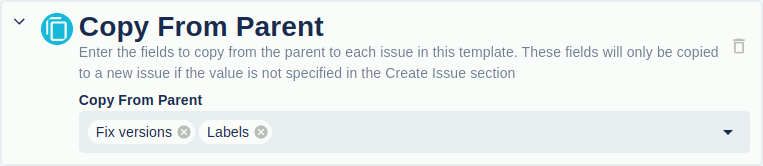
Copy From Parent
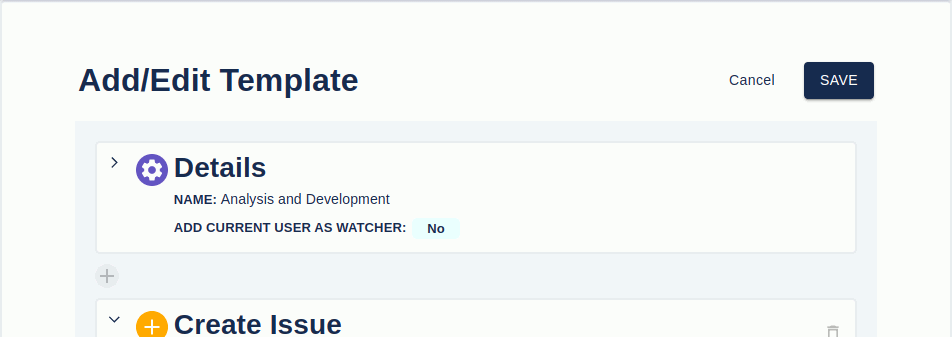
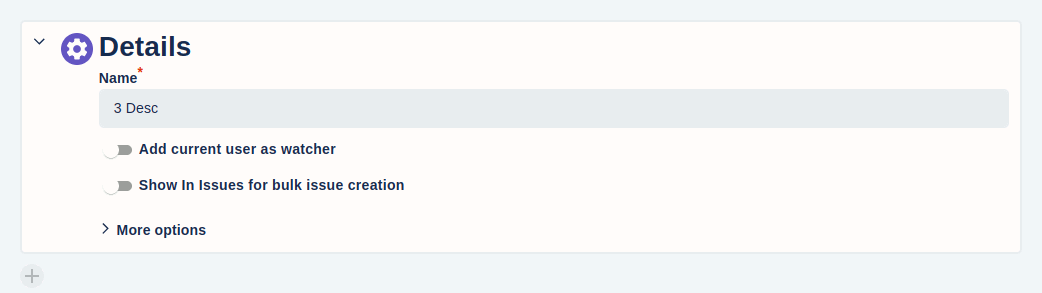
The details section of the template has a name that will help identify the issues to create that belong to it, an "Add current user as watcher" checkbox to add the current user as a watcher for every issue created and optional documentation fields. Clicking on the "Show more documentation options" link will show the description and documentation link fields.
Create Issues Section
This section allows you to select fields that you want copied from the parent issue. You can select as many fields as you want. For the example above just the Fix versions and Labels fields will be copied from the parent Issue to all of the newly created issues. The fields to copy also include a list of custom fields.
The only time any of these fields will NOT be copied is if the field's value is set in the Create Issues section that is being created.
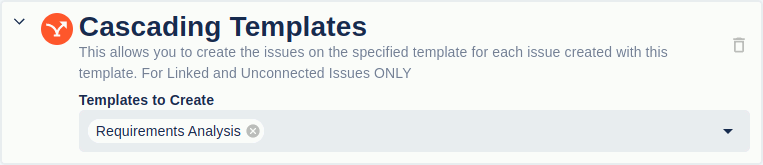
Cascade Template
The Cascade Template section allows you to create other templates (and their issues) for each of the issues being created in this template. This functionality is only available for creating linked and unconnected issues because the cascaded template has the same relationship (linked or unconnected) as the parent template.
For example, if you have two templates, A and B. Template A will create two issues with the summaries Development and Testing. Template B will create a single issue with a summary Security Check. If template A has a cascade template of B then if template A is created as linked issues then each of those linked issues (Development and Testing) will also have new linked issue from template B (Security Check). So a total of four issues are created.
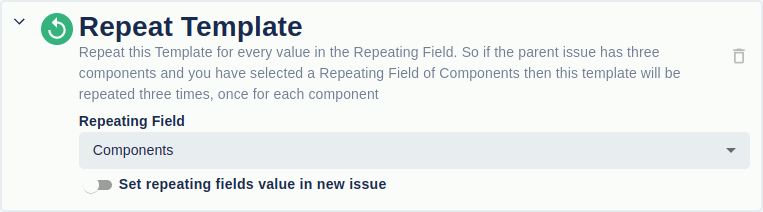
Repeat Template
This section allows you to repeat the template creation based on the selected field (Components or Fix Versions). So if your template has two issues to create and you specify that you want it repeated for Components then two issues will be created for each component that the issue has (i.e. if the template has three issues and there are two components then a total of six issues will be created). If there are no components then no issues will be created.
If "Set Repeating fields value in Issue" is checked then the current field value being iterated over will be set in the issue created (i.e. if the template has one issue definition, a repeating field of Fix Versions (V1 and V2) and the parent issue has two fix versions then two issues will be created where the first issue has a Fix version of V1 and the second of V2).
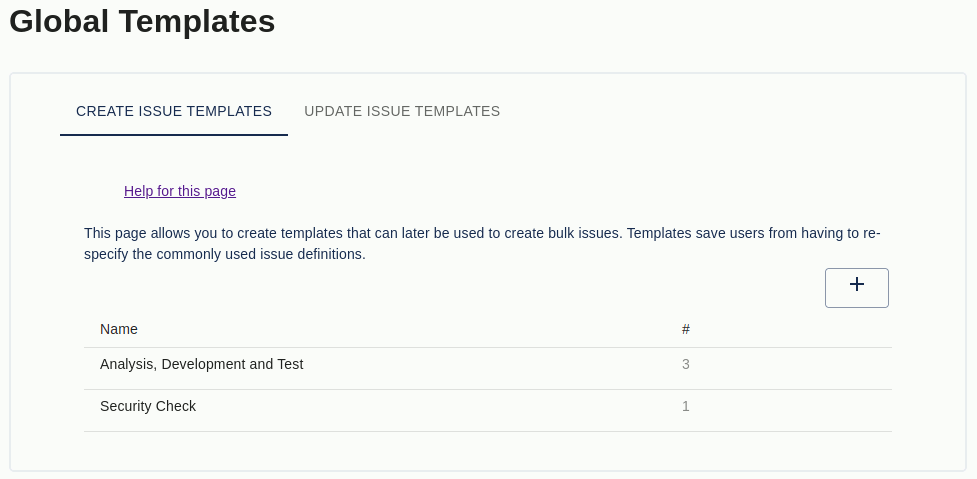
Global Create Issue Templates
Global templates are templates that can be used in any project. The global template page can be navigated to through the menu at the topmost Jira menu (click on the Jira symbol in the top left of the screen) and clicking on the STM Global Templates option.

Clicking on the Global Template menu item will navigate you to the following page.
Create Issue Templates
Adding a new Template will show the page below. This is almost identical to the project template dialog except for the "Show in Issues for Bulk Create pages" checkbox. If this is checked then the template will be shown when creating bulk sub tasks, linked issues, unconnected issues or Epic issues. Either way, global templates are always available for creating as part of an executor (see below).
Apart from the addition of the checkbox, all functionality is identical except that select dialogs such as issue types, priorities, etc will show every possible value from all Projects. This is because global templates are not associated with a particular project and hence cannot show a subset of these lists.
Because these lists show all possible selections, the template that is created may cause an error. This is because the item has a valid value but not for the current Project. If it is used in the correct Project then it will work.
Defining Templates for Updating Issues
For this section, the details apply to updating Issues. Templates for updating Issues are defined either globally for an individual project.
Project Update Templates
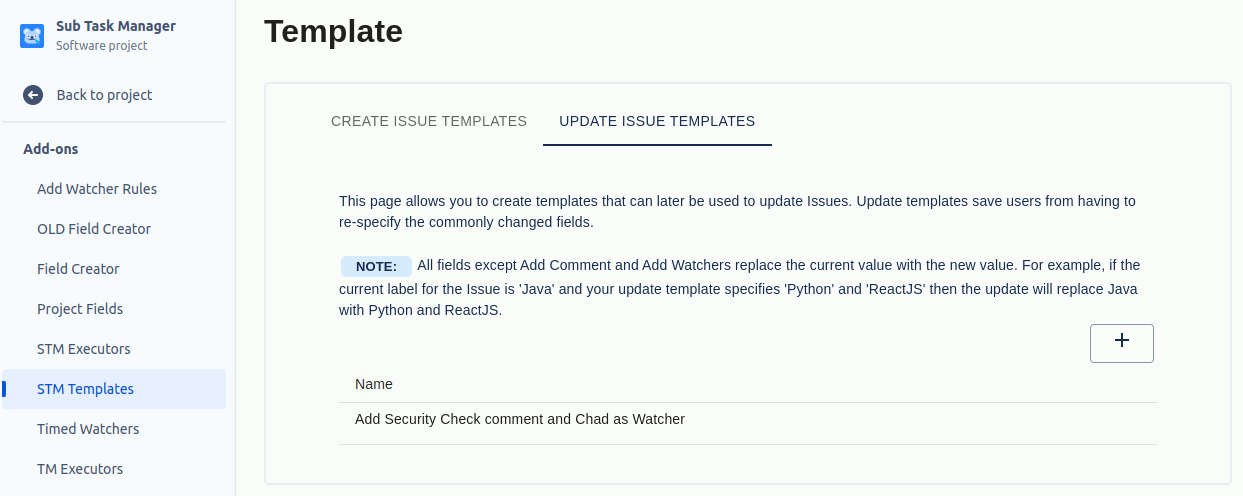
You can define Templates, for updating Issues for each Project. The Projects Template screen is available as a Project tab and can be accessed by Project Admins only or those users defined in the Project Template Access group list in the configuration screen. You can get to the page by going to the general Project pages, Add-ons, STM Templates and then changing to the Update Issue Templates tab
The image below shows the page where templates can be added and edited
Once a template has been defined you can hover over it to see the icons. You can move the template to a different Project or be global, edit it using the pencil icon, duplicate it by using the copy icon or delete it using the trash can icon.
New templates can be added by clicking on the Add button (the plus icon in the top right-hand corner) and this will open the create page shown below.
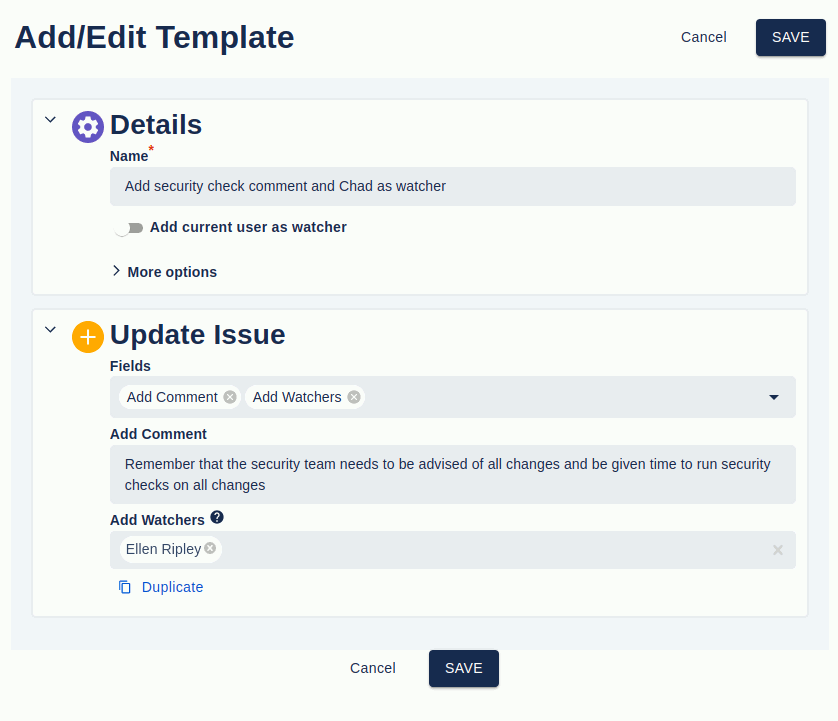
Details Section
The details section of the template has a name that will help identify the issues to create that belong to it, an "Add current user as watcher" checkbox to add the current user as a watcher for every issue created and optional documentation fields. Clicking on the "Show more documentation options" link will show the description and documentation link fields.
Update Issue Section
There is an Update Issue section that specifies which fields in the Issue are updated and what the new values of the field are. The example above has two different fields to update but you are free to define any number you like as long as you have at least one. Occurrences of question marks in a circle, at the end of a field, are help for the field to the left of the question mark. Hovering over these will give you helpful information about the field.
NOTE: All fields except Add Comment and Add Watchers replace the current value with the new value. For example, if the current label for the Issue is 'Java' and your update template specifies 'Python' and 'ReactJS' then the update will replace Java with Python and ReactJS.
The following fields are available in the Update Issue sections:
-
Summary: the summary of the Issue. You can refer to parent fields here by using one of: ${Summary}, ${Description}, ${Type}, ${Assignee}, ${Reporter}, ${Priority} or to a custom field, i.e. ${My Custom Field Name}. If no value is present then the word null show unless an ! is placed after the $ symbol (i.e. $!{Description} will show the description if it is present otherwise it will show nothing). Field references are case sensitive. If this is a Repeating Template (see below) then you can refer to the repeated field value by using ${RepeatItem}
-
Assignee: The user that the issue will be assigned to. You can also refer to the parent issues reporter or assignee by entering ${Reporter} or ${Assignee} respectively.
-
Components: The component(s) that the issue should have.
-
Description: a description of the Issue. You can also refer to the same fields as defined for the Summary (i.e. ${Reporter} etc)
-
Due Date: either the word today (for the day the Issue is created), a date (in the format YYYY-MM-DD) or the number of days, weeks and months (in this order) from the day the Issue is created (i.e. 1m 2w 3d for one month, two weeks and three days, 2d for two days ...)
-
Original Estimate: the number of minutes, hours, days and weeks (is this order i.e. 3d 4h, 1w 10m ....), a percentage of the parent's original estimate (20%) or as a multiplier of the parent estimate (*0.25)
-
Fix Versions: The fix versions for this issue.
-
Issue Type: The issue type that the updated Issue will have
-
Labels: Any labels you wish to add
-
Priority: One of the pre-defined priorities for an Issue
- Reporter: Start typing the user's name and a selection of matching names will appear. You can also refer to the parent issues reporter or assignee by entering ${Reporter} or ${Assignee} respectively.
-
Custom Fields: you can specify any custom field (up to five total) of type single-line text, multi-line text, number, and single select item, multi-item select, URL. The value for that selected field can be specified.
-
Project Key: The key of the project this issue belongs to (can't be used for subtasks).
-
Add Watcher: Adds the specified users to the as watchers of the updated Issue
-
Add Comment: Adds a comment to the updated issue
You can add more fields to set by selecting them from the "Fields to display" dropdown menu. You can also remove fields by clicking the X next to their name. There is only one Update Issue section
Global Update Issue Templates
Global templates are templates that can be used in any project. The global template page can be navigated to through the menu at the topmost Jira menu (click on the Jira symbol in the top left of the screen) and clicking on the STM Global Templates option.
The content of global Update Issue Templates are identical to the Project ones. Please see the Project Update Issue Templates section for more details
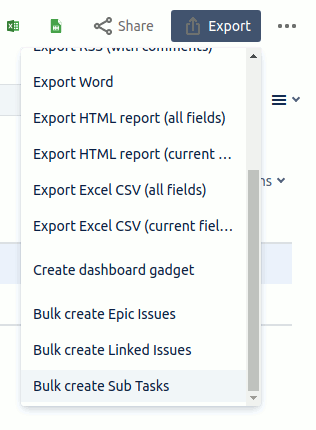
Manually Creating/Deleting Bulk Issues
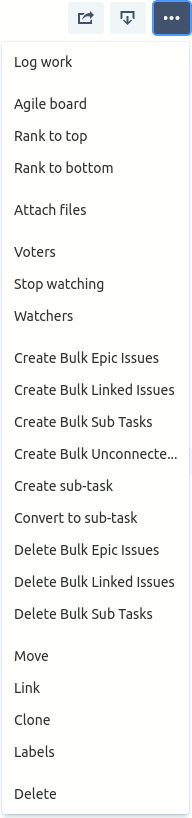
In the Issue pages More menu there are options to create bulk sub-tasks, linked Issues, Epic Issues, unconnected issues and to delete sub-tasks, linked issues or Epic issues. Epic Issue creation and deletion are only available if you are running the "JIRA-Software" version of JIRA.
If you select one of the create bulk Issue menu items then a dialog similar to that below will be displayed.
NOTE: This section doesn't describe how to create a template just how to use existing ones. Please see the Project Template section for more details on creating templates.
There are three ways of using this dialog: Creating a template, creating a modified template and creating your own template from scratch.
Creating a Template
This option can be used when the top toggle button has "Create Template" selected. You are given the choice of which template you want to create (all of the current Project templates and global templates that are visible to the bulk create pages), the default issue type to use (if there isn't one already specified in the template) and, if this is creating linked issues, the link type.
When the above options are specified then you can click on the Create button.
Creating a modified template
This option can be used when the top toggle button has "Modify Template" selected. You are given the choice of which template you want to create (all of the current Project templates and global templates that are visible to the bulk create pages) and that template is shown at the bottom of the dialog. The template can be modified however the user likes and that modified is what will be created. The original template IS NOT updated with the modifications.
The user also needs to select the default issue type to use (if there isn't one already specified in the template) and, if this is creating linked issues, the link type. The modified template will then be created when the Create button is clicked.
Create your own template
This option can be used when the top toggle button has "Create your own template" selected. At the bottom of the dialog you are given an empty template where you can specify the issue(s) that you want to create.
The user also needs to select the default issue type to use (if there isn't one already specified in the template) and, if this is creating linked issues, the link type. The modified template will then be created when the Create button is clicked.

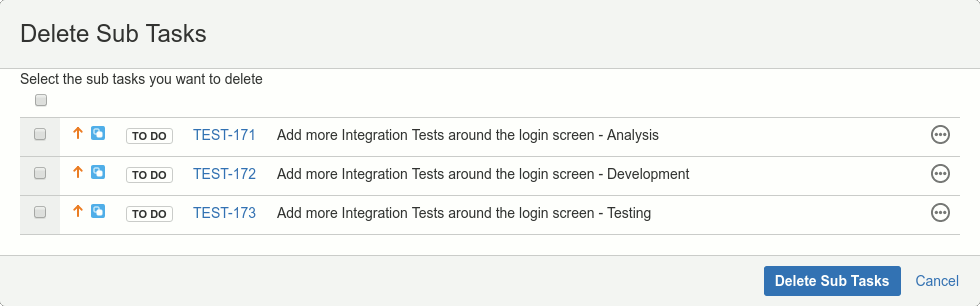
Delete Bulk Issue
To delete bulk Issue, select the appropriate delete bulk menu item. That will display a dialog like that shown below. Check the boxes of the Sub Tasks you want to delete and press "Delete Sub Tasks". You can also click on the circle containing three dots to display more information about the Issue.
Project Executors - Automatic template creation
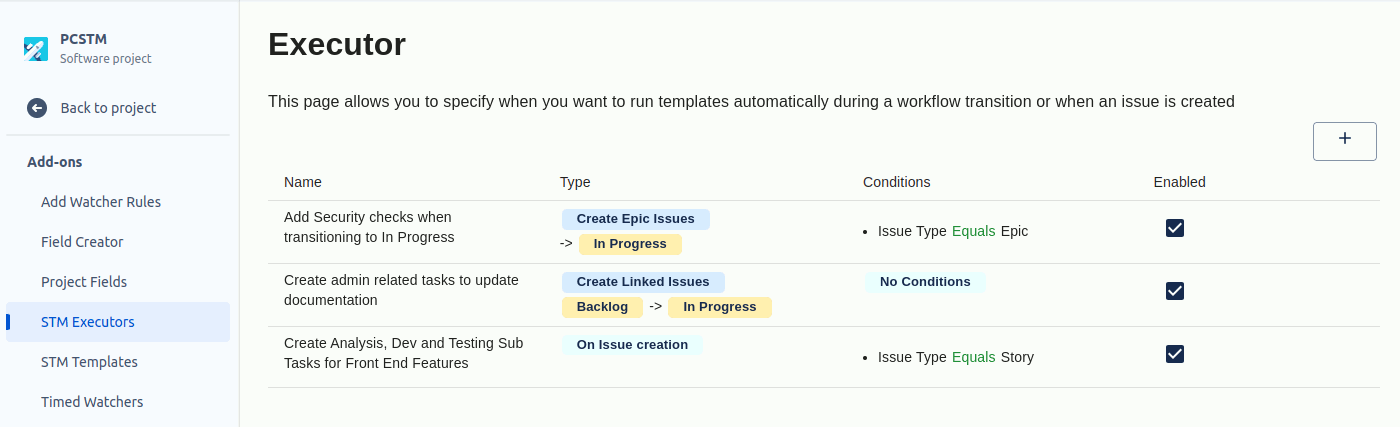
To automatically create bulk sub-tasks, Linked Issues, Epic Issues or Unconnected Issues you need to use an Executor. A Projects Executor page is available as a Project tab (go to the project -> Add-ons -> STM Executors) The image below shows the page where executors can be added and edited.
Executor (when enabled) will create issues automatically, based on the specified template and criteria. If you don't want a template to run then edit the Executor and uncheck the Enabled checkbox.
If you hover over an Executor three icons will be shown on the right-hand side. The angled arrow allows you to move the Executor and its Template to a different Project (or global), the pencil icon allows you to edit the Executor, the copy icon will duplicate the Executor and show it in a new Executor dialog and trash can icon will delete the Executor.
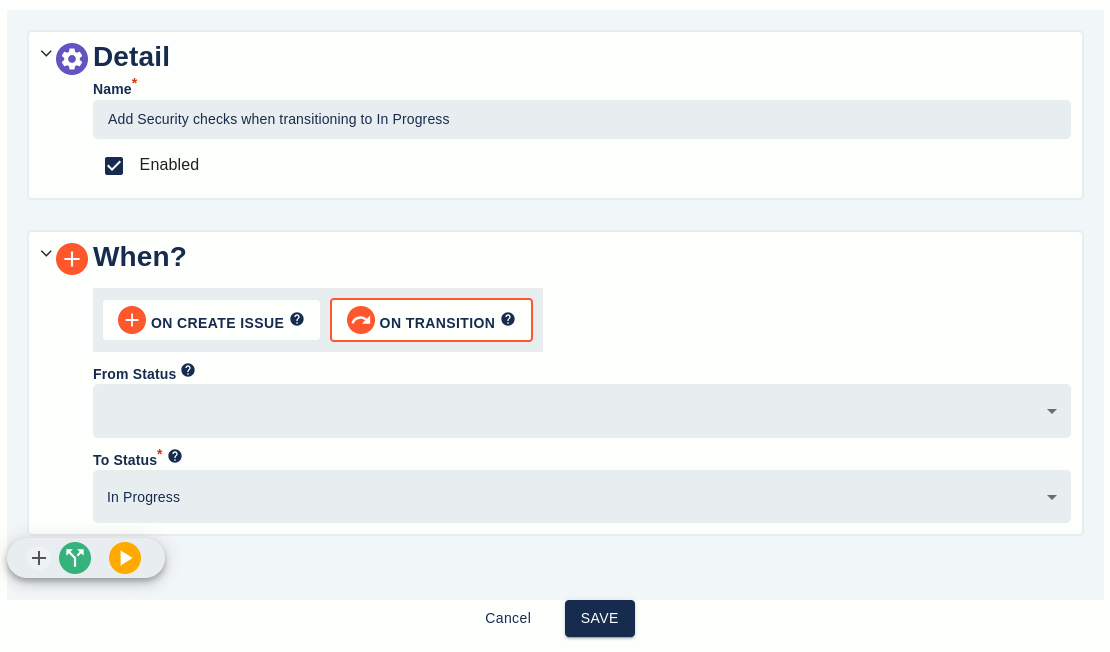
New Executors can be added by clicking on the add button (plus icon, top right-hand corner) and this will show the add Executor page shown below
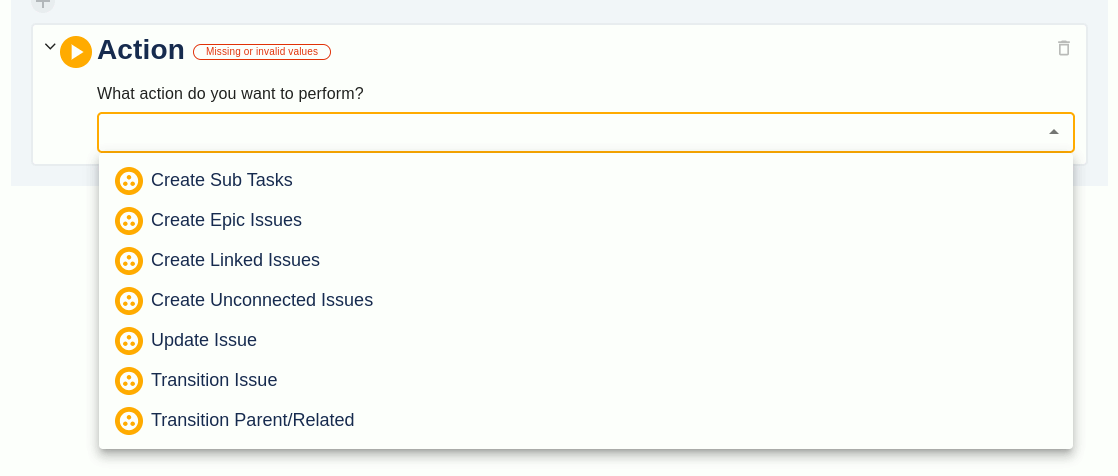
To start with, you are asked to enter the name of the Executor and whether it is enabled or not. You now need to decide when the executor will run: when the issue is created or when it is transitioned. Click on "On Create Issue" or "On Transition" to continue. For the purpose of this documentation, we clicked "On Transition"
For On Transition we need to enter the To Status of the transition and optionally select the From Status.
Once the When section is filled out you can click on the green icon (to add a new condition) or the yellow icon (to add a new action). This pop-out icon menu will show automatically at the end of all sections if, and only if, there are valid options. You can also use the pop-out icon menu between other sections if there is a plus symbol.
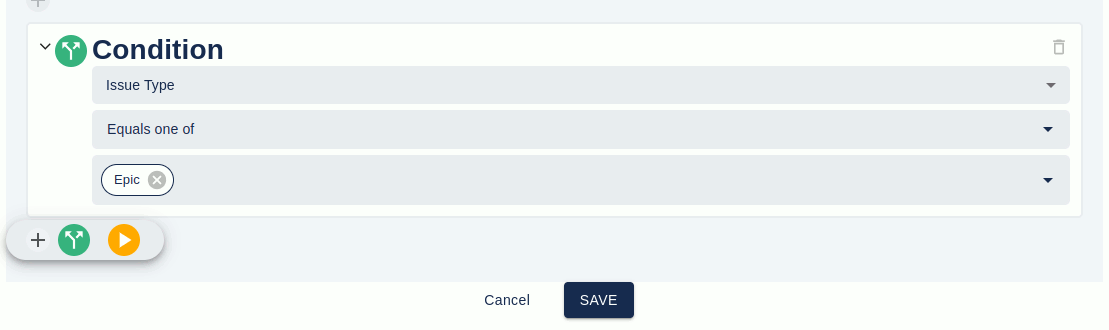
For this example, we will add a condition to the Executor. Clicking on Condition (the green icon) will allow us to specify a condition. The condition can either be specifying a field's value or stating who the current user must be.
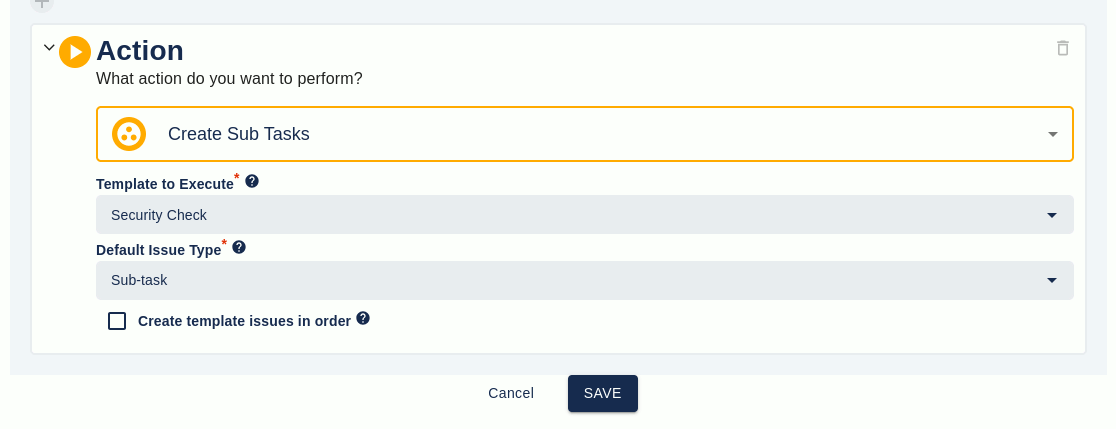
We add a condition to make sure that the Issue type is an Epic and click Next. We then get to choose between adding another Condition or an Action. For this example, we add an Action. The Action section allows you to specify the actions that you wish to do for the Executor.
We choose to create a Sub Task.
We then select the template to use and the default issue type. After that, we click save and return to the Executors page.
NOTE: It is still possible to add additional conditions by hovering over the plus symbol between the Condition and Action sections and then clicking on the green condition icon.

Transition Issues
Transitioning Child Issues
Rules:
-
Issues in the same project can only be transitioned to the same status as the parent issue is going to. This is a safety mechanism to stop recursive transitions from going out of control.
-
If there is a "from status" then the issue will ONLY be transitioned if it currently has the "from status".
-
An issue will be transitioned ONLY IF the "to status" is one transition away
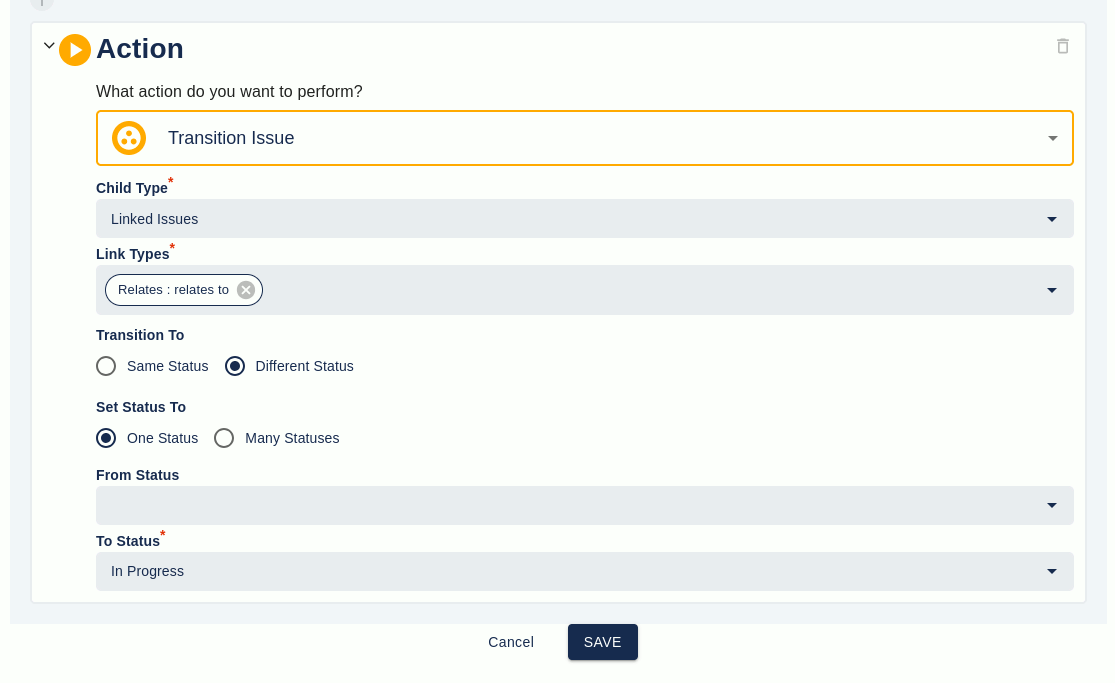
For Transitions, there are three variations that can be used to set up an Executor. The simplest is for transitioning issues to the same status as the parent issue (issues can be in any project). You select the child type (subtask or linked issue) and which of the child issues you want to transition (for linked issues you say which link types you want and for subtask you specify which issue types). The Transition To field is left as the same Status. The example below will transition all linked issues of the type "relates to" to the same status as the parent issue (but only if that transition takes just to step).
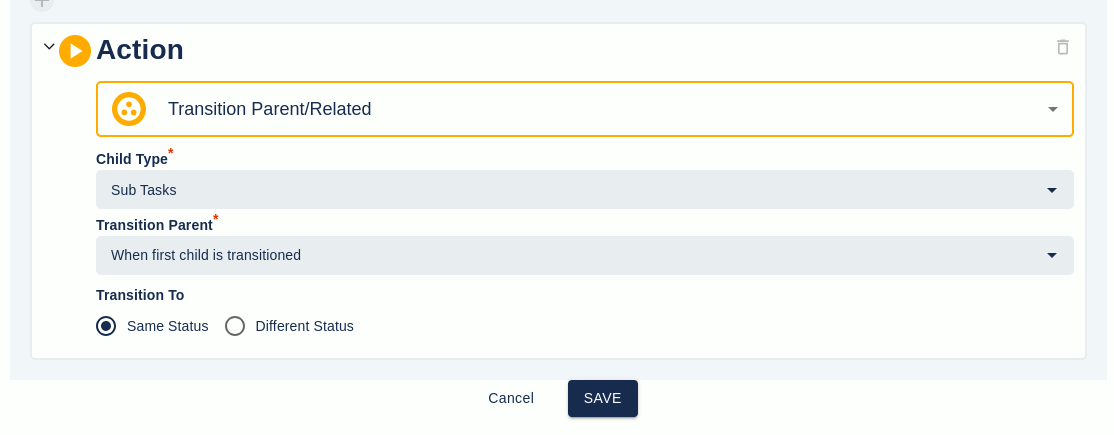
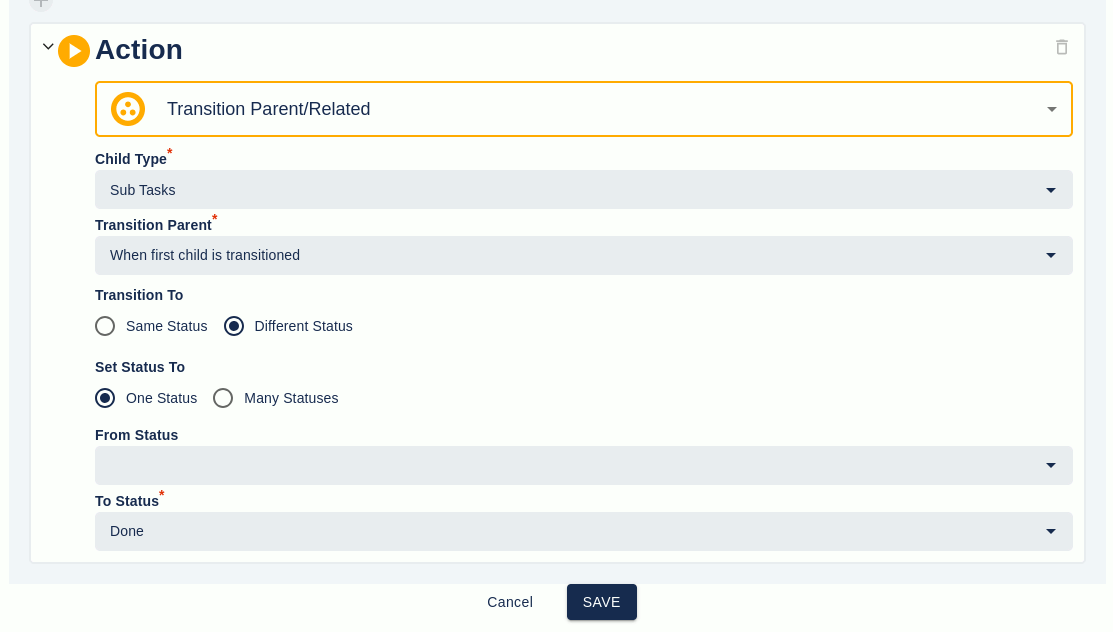
The next type of transition is when you want to transition related issues from one status to another regardless of what status the parent has. As you can see below we have the same fields as above (see above for an explanation of those fields) plus three more. The first, Status Set To, is left at One Status. We then have the From Status and To Status fields. They specify what status the child issues must start on (this is optional) and what status they will be transitioned to. The example below will transition "relates to" linked issues to In Progress regardless of their initial status but only if In Progress can be transitioned to with just one transition.

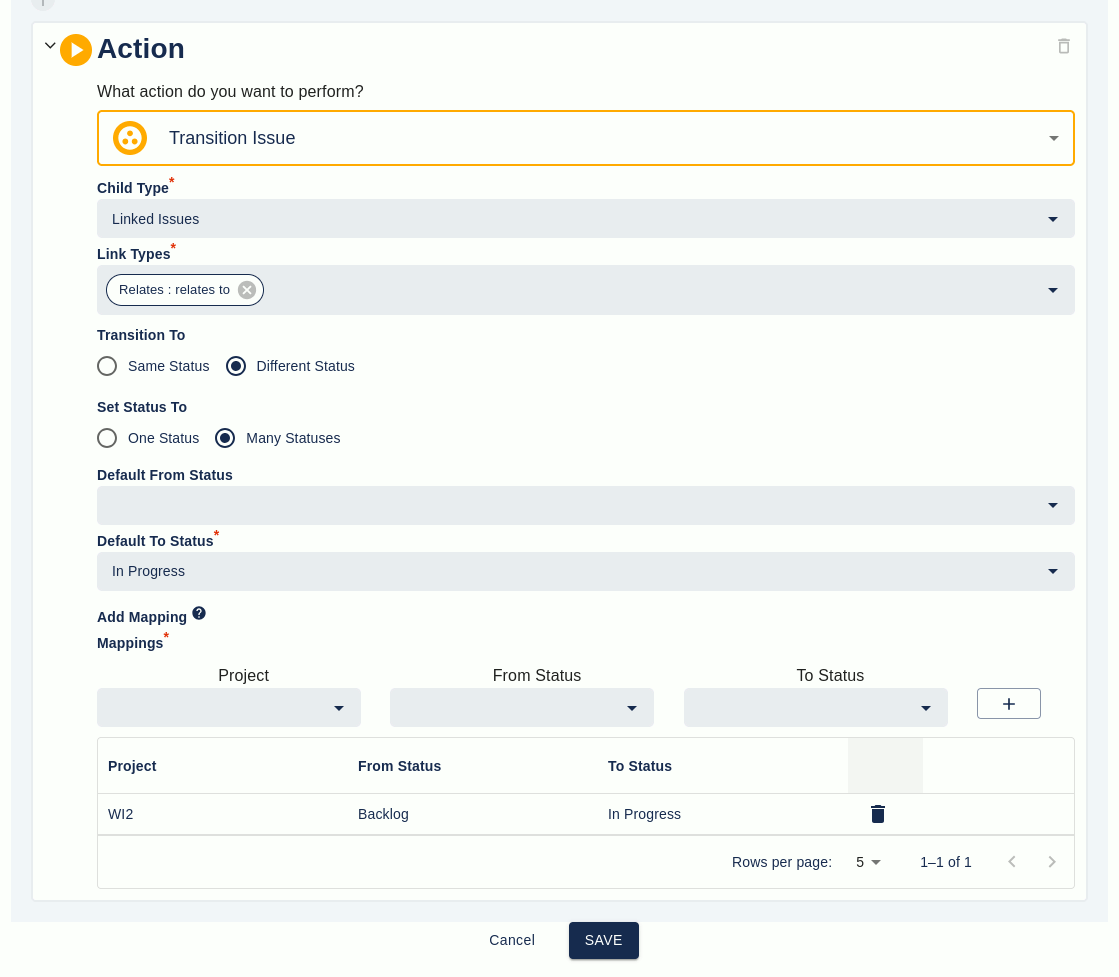
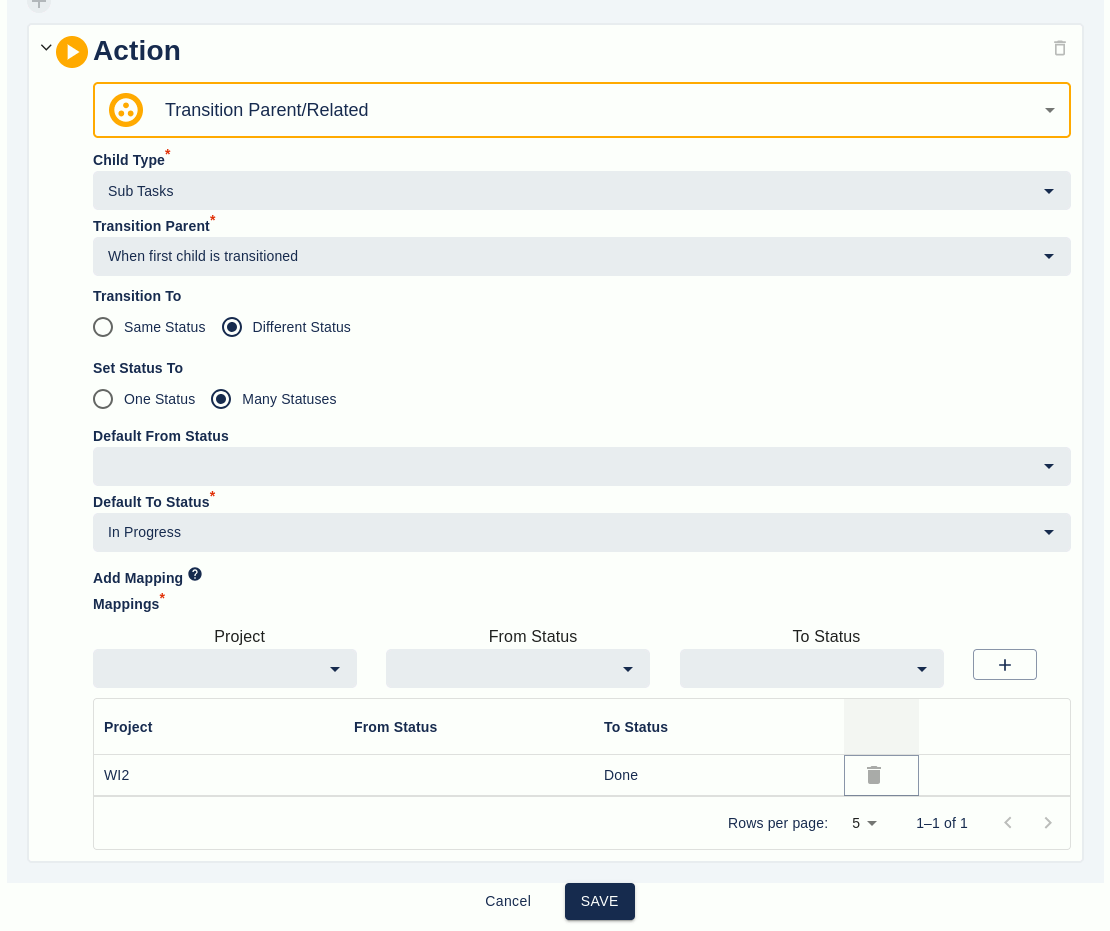
The next type of transition is the most complicated one and also the most powerful. We same have the fields shown above (From and To Status is now Default From and To Status) and we also have the ability to specify from and to statuses for individual projects. For the example below "relates to" issues in the WI2 project will transition to In Progress only if they currently have the Backlog status and the current project will transition to In Progress status no matter what status they currently have.
Transitioning Parent/Related Issues
Transition Parent/Related issues can be used in three different scenarios where you have a parent/related issue with either epic issues, subtasks or linked issues. You can transition the parent in two ways: when the first child is transitioned or when the last child is transitioned.
In the first option, when the first child issue is transitioned to a new status then the parent issue is also transitioned. For example, you have a parent issue A with two subtasks B and C, all are on the status To do. When the first child (either B or C) is transitioned to In Progress then issue A is automatically transitioned to In Progress.
The screenshot below shows an example of scenario one when the children are subtasks.
For the example above the Executor is designed to run when the children are subtasks and you want the parent to go to the same status as the transitioned child.
The second option is for when the parent is transitioned after the last child is transitioned. For example, you have a parent issue A and two linked issues B and C (on the same link type), issues A and C are on status To do and B is on the status In Progress. When issue C is transitioned to In Progress issue A will be automatically transitioned to Done.
The screenshot below shows the settings to accomplish this.
Lastly, we have an example of transitioning a parent/related issue when connected as an Epic issue.
For the example above, the Executor is designed to run when the last child (an Epic issue) is transitioned. When this occurs the parent can be transitioned to one of two statuses. If the Epic is in the TEST project then the parent is transitioned to Done, otherwise, it is transitioned to In Progress.
Global Executors - Automatic template creation
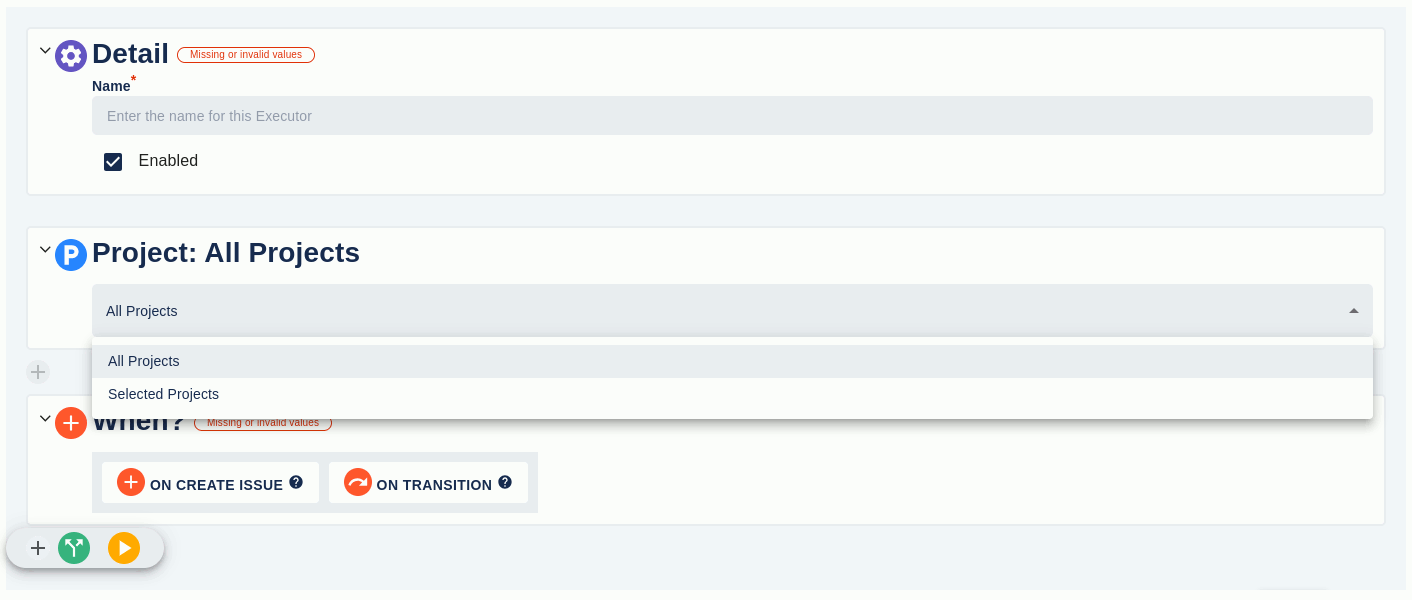
Global Executors are very similar to Project Executors. The only difference is that you have to either choose if it applies to all projects or for a select group of projects it will apply to. See Project Executors, above, for the general usage of an Executor.
The screenshot below shows the difference for the Global Executor. This includes a selection of whether this is for all or selected projects and if it is for selected projects then which ones.

Automatic issue creation - In Action
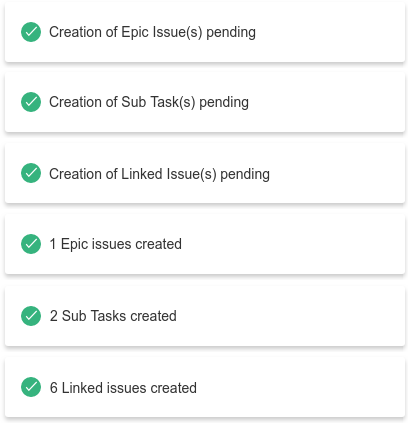
When an Issue completes a transition that creates issues through an Executor a message box is displayed to inform the user that processing is occurring in the background. STM will keep checking in the background to see when the Issues have been created.
When they are created then the Issue is refreshed to display them and a message is displayed to show that they have been created. Below are examples of the pending and created messages
If an error occurs during the creation process then an alert dialog will be displayed telling the user what happened.

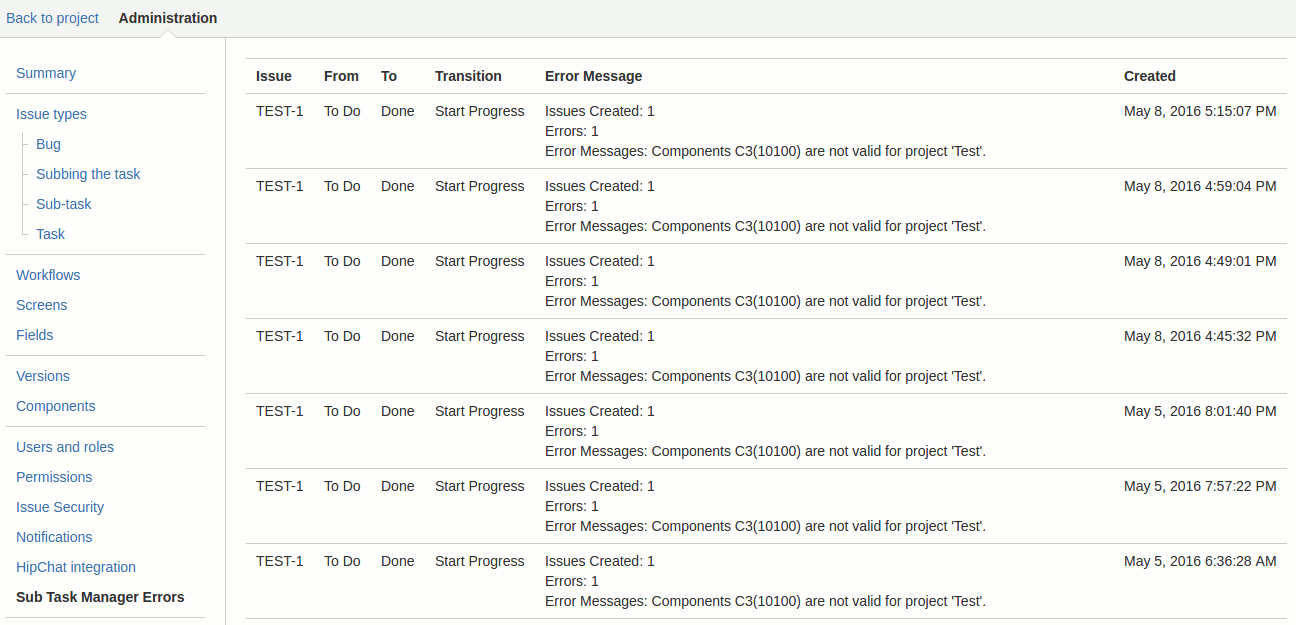
As well as being displayed in the popup dialog all STM errors are also available in a project admin area (see below). In this area there is also a STM Audit page that will show what was create and why a template was not created.
Errors
Any errors that occur during the creation of sub tasks or Epic Issues in a workflow transition can be viewed under the "STM Errors" tab in a project administration screen. Details are kept for up to two weeks after the error occurs (at which time they are deleted).
Bulk Update of Issues from an Issue filter
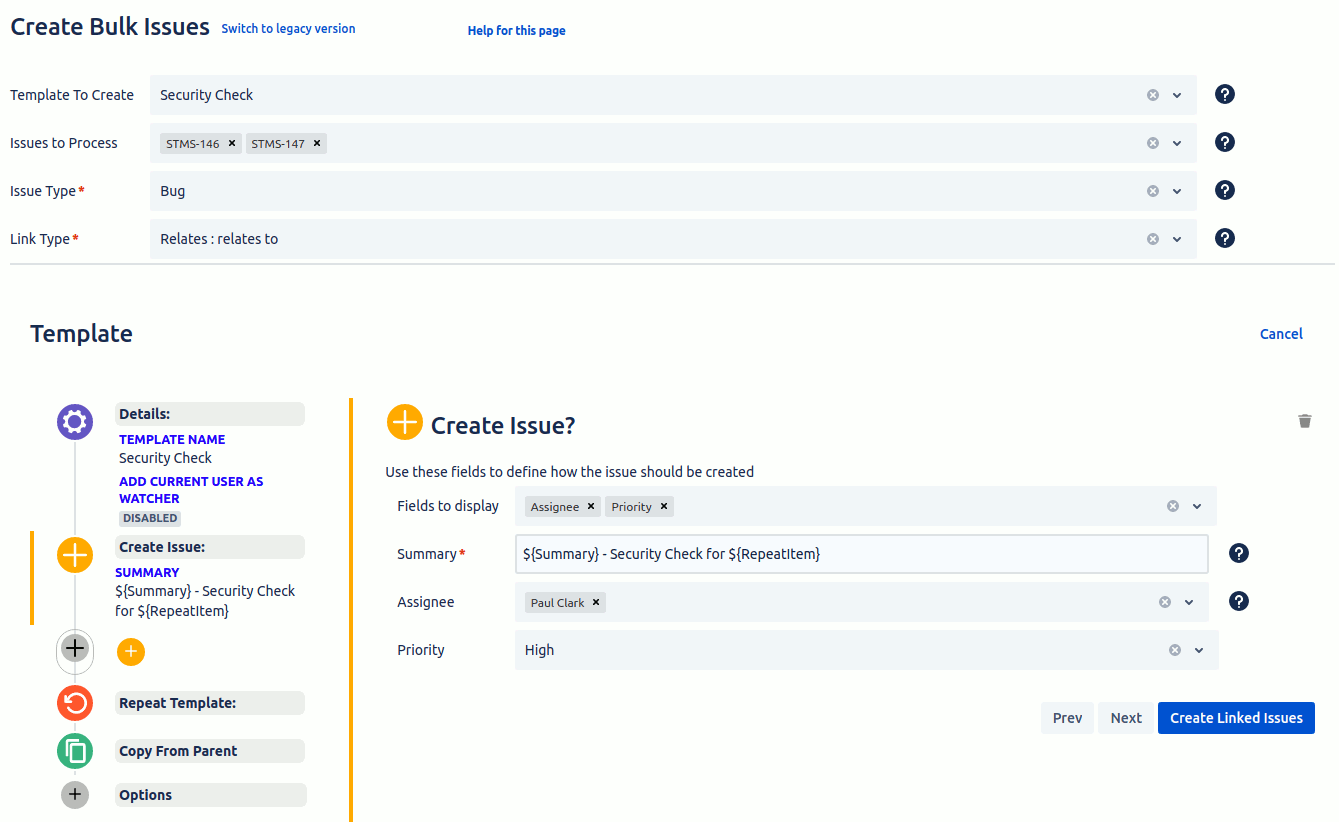
In each project, there is an issue filter that allows you to get a selection of issues using either a pre-defined filter (i.e. My Open Issues...) or JQL. The filtered list can have a template applied to each issue to create sub tasks, Epic issues or linked issues. To do this select the appropriate option from the export menu (top left-hand corner of the screen).
This will take you to a template selection screen. Below is the linked issue template selection screen.
This screen looks almost the same as when you manually create bulk linked issues. The only difference is the "Issues to Process" field which lists the keys of all the issues from the issue filter screen. You can remove or add issues keys by clicking to the right of the existing keys. Please see the create bulk sub tasks section above for details of using the rest of this form.
If you are wanting to use a Repeating Template then you will need to make sure all of the issues to process are from the same project.
NOTE: The only templates shown here are global templates. This is because the filter screen can show issues across multiple projects.
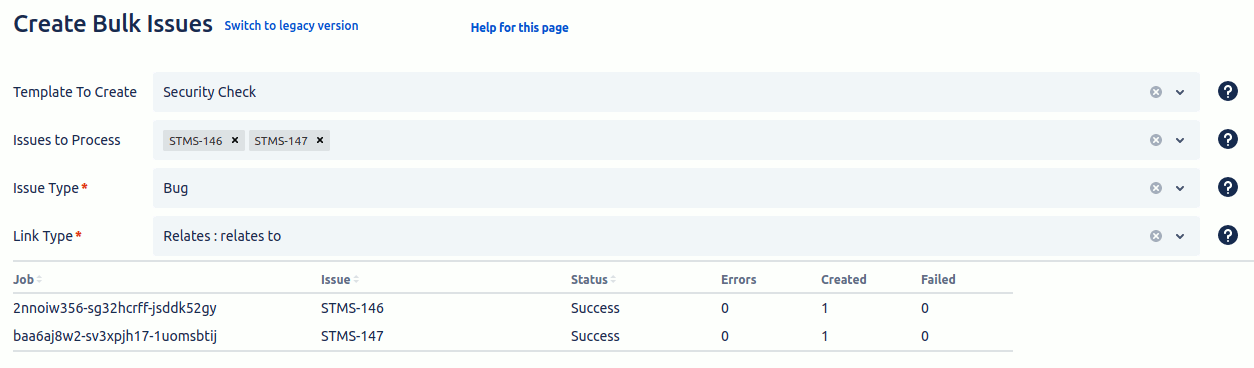
When you have finished selecting a template or manually setting one up just click the Create Sub Tasks button to start creating issues. This will hide the screen above and show each Issue key, the processing progress and any information, such as issues created or errors. When the example above was run and was completed it looked like the screen shown below.
Creating linked issues or Epic issues looks very similar to that shown above and so won't be shown here.
Configuration
Change Log
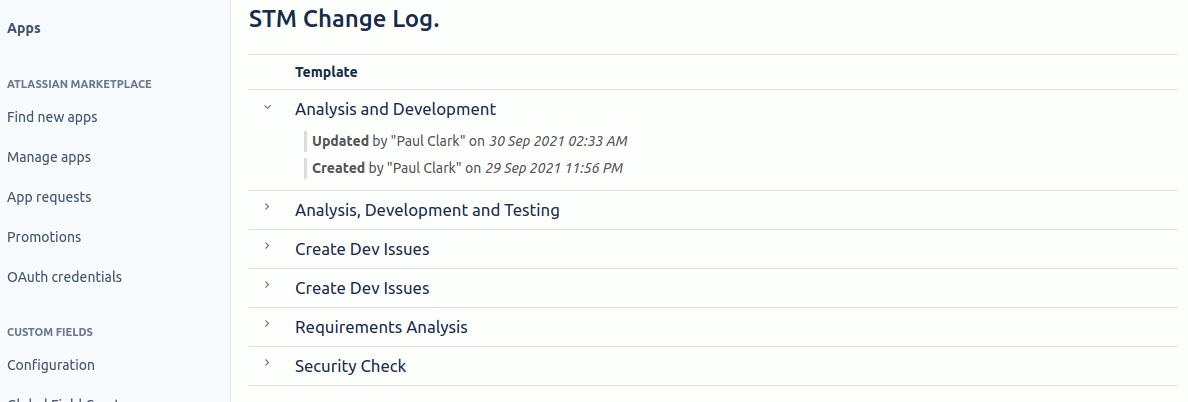
The change log page allows you to audit changes that have been done to templates in the last three months. The example below shows the Analysis and Development template was create on the 29th Sep 2021 and updated the next day. The audit data also includes deleted templates.
Configuration
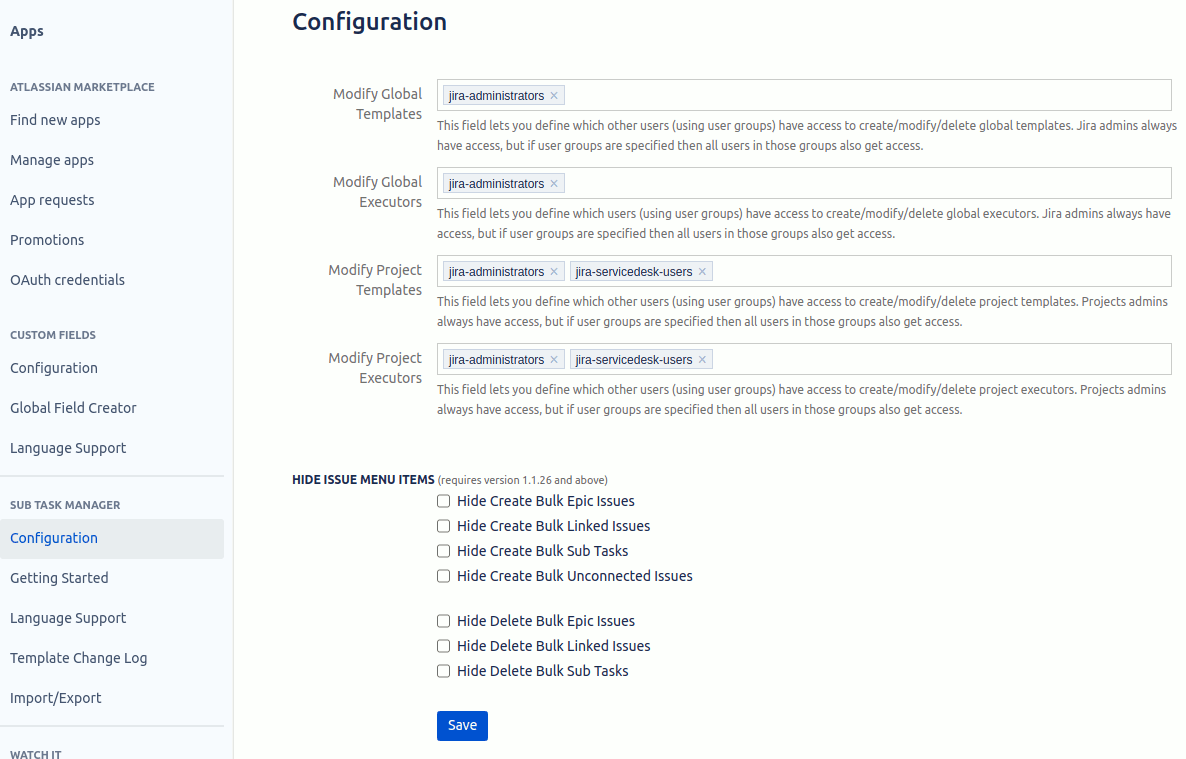
The configuration screen allows you to define access to the global and project Template and Executor screens.
For the global Template and Executor pages, system admins always have access. For the project Template and Executor pages, project admins always have access. Use one of the two fields (shown below) to specify which additional users will also have access by entering one or more user groups. All users in those groups will then have access.
Getting Started
The Getting Started page is a good starting point for users unfamiliar with STM. It specifies commonly used terms and allows the user to create examples of Templates and Executors.
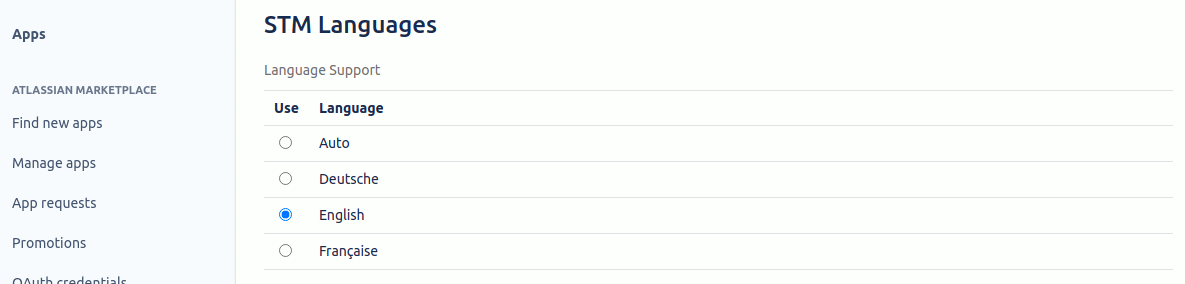
Language Support
NOTE: Translations apply to all text EXCEPT the menu text, tab text, and panel heading text.
The Langauge Support section allows you to choose a language to get the App to choose for you. This plugin comes with three languages pre-installed: English, French and German.