** An Atlassian Gold Partner **


NOTIFY WATCHER for Jira Server


This plugin allows you to watch projects and optionally send a custom email when adding / removing watchers to a JIRA issue / project. You can also send an invite to notify user(s) of an issue that may be of interest to them.
Project watchers can be added by using the new tab (Watch Project) on the Project Summary screen. Watchers can be notified of events for all issues or just a subset, by selecting the relevant events to monitor and identifying issues using a statement JQL. Access to the Watch Project tab can be restricted (see the Configuring Access to Watch Project tab).
Two new icon buttons (shown below) have been added to the issue screen to allow you to open the Manage Watcher or Invite screens.
Watching a Project
Notify Watchers allows users to add as a watcher of a project. This can be done from the Watch Project tab in the Project Summary screen.
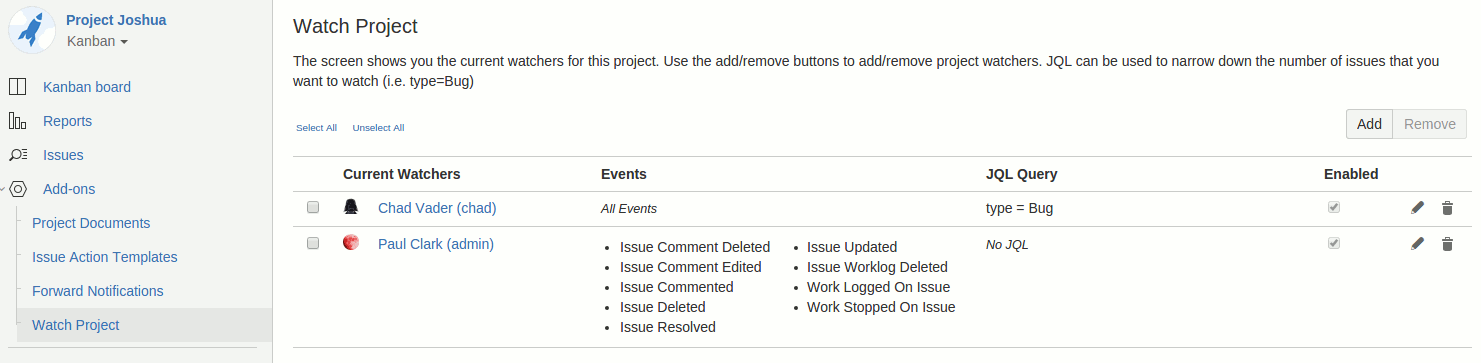
The screenshot above shows two watchers for the project. Chad Vader only receives emails that belong to issues that have a type of Bug. Paul Clark will receive emails where the event type is one of the eight shown (Issue Resolved, Issue Worklog ...). The icon buttons on the right side of each user allow you to edit the JQL statement or remove the watcher.
Add Project Watchers
A project watchers can be added by clicking on the Add button of the Project Watcher tab.
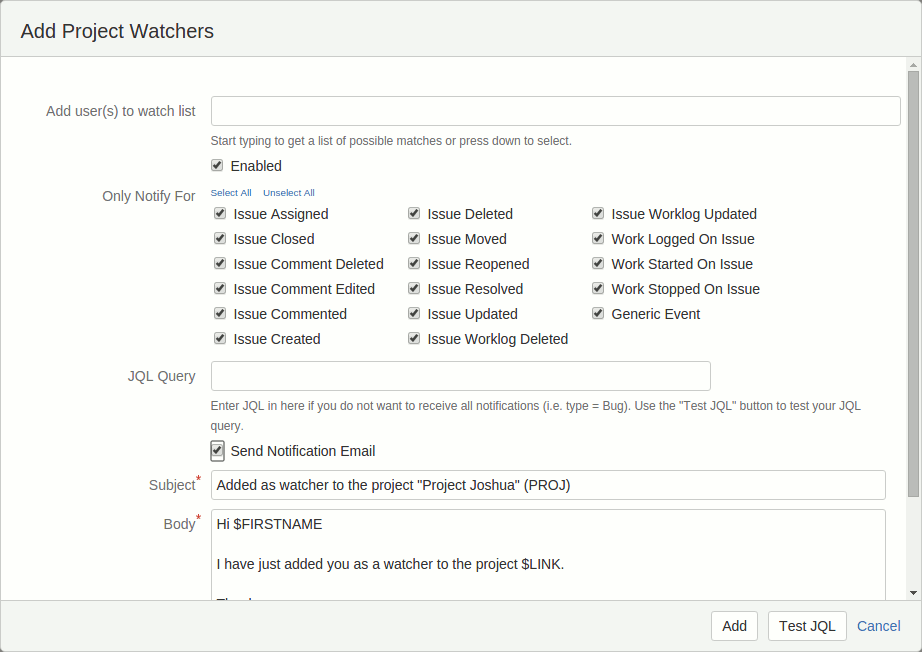
At the top of the screen is an autocomplete input that allows you to enter the users you wish to add.
Next is the enabled checkbox, in case you do not want it to be enabled straight away. Following this is the Events that the notification is for. All these events are selected by default but you can select/unselect whichever ones you want, to narrow down the notification list. There must be at least one event to notify.
Next is the JQL Query field. This is optional and if not specified will mean that all emails are sent to the watcher. If specified only issues that match the query will have emails sent.
Under this field is the checkbox "Send Notification Email". If this is unchecked then clicking Add will add the users as watchers to the project. If the checkbox is checked then the Subject and Body fields are shown with a default email subject and body. These fields can be customized but both must have something in them. An individual email will be sent to each user upon clicking the Add button.
The Body field has two variables that can be used within the text. These will be replaced by actual values when the email(s) are sent. The first is $FIRSTNAME and is the first part of the name of the JIRA user. The second is $LINK and this is the name of the JIRA Project and Project key hyperlinked back to the JIRA Issue.
Clicking the Test JQL button will test the JQL statement is valid. If it is not an appropriate error message will be displayed.
Remove an Issue Watcher
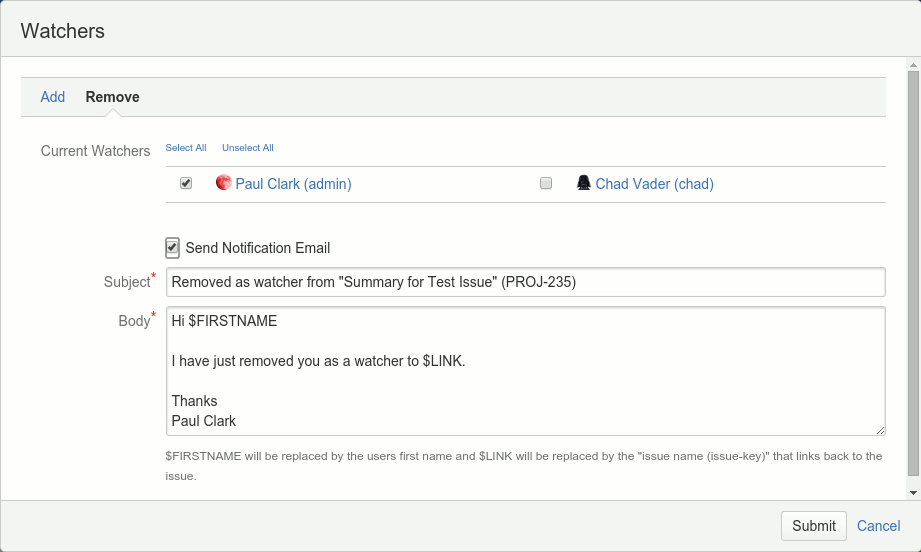
Project watchers can be removed by clicking on the trash can beside the user or by selecting multiple users checkboxes and clicking remove.

At the top of the screen are the project watchers that were selected to be removed.
Under these are the checkbox "Send Notification Email". If this is unchecked clicking Remove will remove the users as watchers. If the checkbox is checked then the Subject and Body fields are shown with a default email subject and body. These fields can be customized but both must have something in them. An individual email will be sent to each user upon clicking the Submit button.
The Body field has two variables that can be used within the text. These will be replaced by actual values when the email(s) are sent. The first is $FIRSTNAME and is the first part of the name of the JIRA user. The second is $LINK and this is the name of the JIRA Project and Project key hyperlinked back to the JIRA Issue.
Editing a Project Watcher
A watcher can be edited by clicking on the pencil beside to the right of the user. The dialog below is then shown.

A watcher can be enabled/disabled, their notification events can be changed and the JQL maintained from this dialog. The Test JQL button will allow you to test any JQL to make sure it is valid.
Add an Issue Watcher
A watcher can be added by selecting the "Watchers" item on the "More" drop down menu or by selecting the eye icon to the right of the Watchers on an Issue. The picture below shows the dialog for adding new watchers.

At the top of the screen is an autocomplete input that allows you to enter the users you wish to add.
Under this field is the checkbox "Send Notification Email". If this is unchecked then the users will be added exactly the same as is currently done in JIRA. If the checkbox is checked then the Subject and Body fields are shown with a default email subject and body. These fields can be customized but both must have something in them. An individual email will be sent to each user upon clicking the Submit button.
The Body field has two variables that can be used within the text. These will be replaced by actual values when the email(s) are sent. The first is $FIRSTNAME and is the first part of the name of the JIRA user. The second is $LINK and this is the name of the JIRA Issue and Issue key hyperlinked back to the JIRA Issue.
Remove an Issue Watcher
A watcher can be removed by selecting the "Watchers" item on the "More" drop down menu or by selecting the eye icon to the right of the Watchers on an Issue. The picture below shows the dialog for removing new watchers.
At the top of the screen are the current watchers of the Issue and some "Select All" / "Unselect All" links.
Under these are the checkbox "Send Notification Email". If this is unchecked then the users to be removed exactly the same as is currently done in JIRA. If the checkbox is checked then the Subject and Body fields are shown with a default email subject and body. These fields can be customized but both must have something in them. An individual email will be sent to each user upon clicking the Submit button.
The Body field has two variables that can be used within the text. These will be replaced by actual values when the email(s) are sent. The first is $FIRSTNAME and is the first part of the name of the JIRA user. The second is $LINK and this is the name of the JIRA Issue and Issue key hyperlinked back to the JIRA Issue.
Invite User
If you think a user might be interested in a JIRA Issue you can send them an invite by clicking on the envelop icon on the right-hand side of watchers.
This will open the dialog shown below.
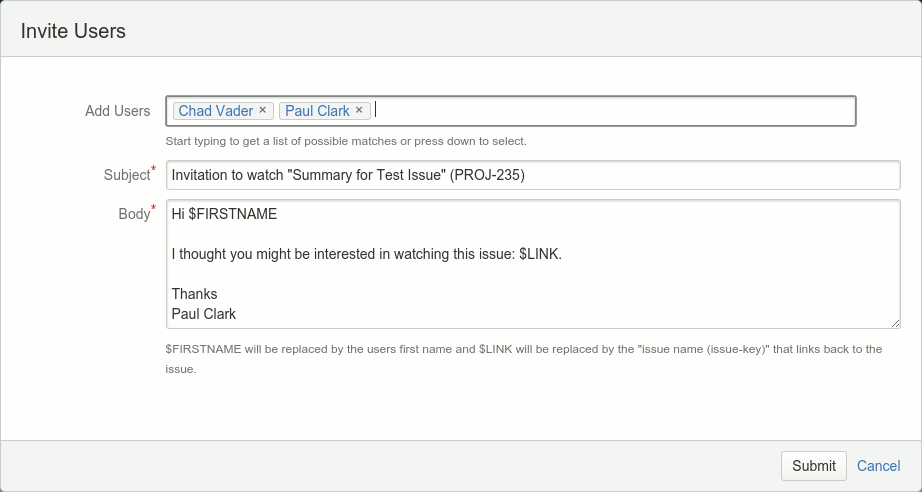
You can enter any number of users for the invite and modify the email subject and body. When submit is pressed individual emails will be sent to each user.
The Body field has two variables that can be used within the text. These will be replaced by actual values when the email(s) are sent. The first is $FIRSTNAME and is the first part of the name of the JIRA user. The second is $LINK and this is the name of the JIRA Issue and Issue key hyperlinked back to the JIRA Issue.
Configuring Access to Watcher Project tab
Notify Watcher allows you to specify which users will have access to the Watch Project screen. The screen below can be reached by clicking on the Configure button for Notify Watchers in the Manage add-ons screen or by going to the Admin tab under System -> Notify Watcher

One or more user groups can be specified. If no user groups are specified then all JIRA users have access to the Watch Project tab. If one or more user groups are specified then only users that are in at least one of the groups will be able to see and use the Watch Project tab.